Rostered Applications
Lexia
Fixing Archived Lexia Students
Overview
There are some circumstances where a student might stop being imported to Clever for an extended period of time. Most commonly this is because the student withdrew at some point then re-enrolled at a later date. Clever retains the association between a unique Clever ID and a student's unique identifiers for 300 days.
This causes a problem when a student existed in Clever at one point, stops being imported for 300 consecutive days, then begins to be imported again. When a student's Clever account data is dropped during a Clever -> Lexia sync, Lexia places the student in an archived state.
If the student wasn't missing from Clever for 300 days then they should be re-assigned their original Clever ID. In this case Lexia can correctly map the ID from Clever to the ID stored in Lexia and automatically restore the student from the archive during the sync.
If the student was missing from Clever for 300 days, they will have a new Clever ID but retain their original student username, causing a mapping conflict in Lexia because
- Lexia can't create a new student record in Lexia since one already exists with that username
- Lexia can't automatically restore the student from its archive because there is a mismatch between the Clever ID stored in Lexia, and the new Clever ID that Clever is sending to Lexia.
When this happens we need manually upload a CSV file to myLexia which updates the student's stored Clever ID in order to align their username with the new Clever ID.
CSV File Format
Template: lexia-fix.csv
| Header | StudentID | Username |
| Description |
The student's Clever ID i.e. |
The student's SBLSD username i.e. |
Example:
StudentID,Username
6504c4a636d74cfc905c80c5,smithjoh000
Instructions
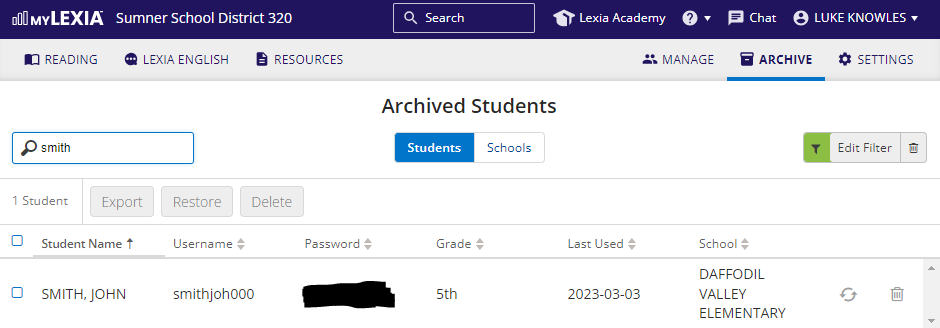
Confirm That the Student Is Archived in myLexia
1. Launch myLexia from the Clever Portal
2. Access the Archive tab
|
|
3. Search for the student. If a matching result is found, then the student is confirmed to be in the myLexia archive
|
|
Build the Lexia Student ID Update File
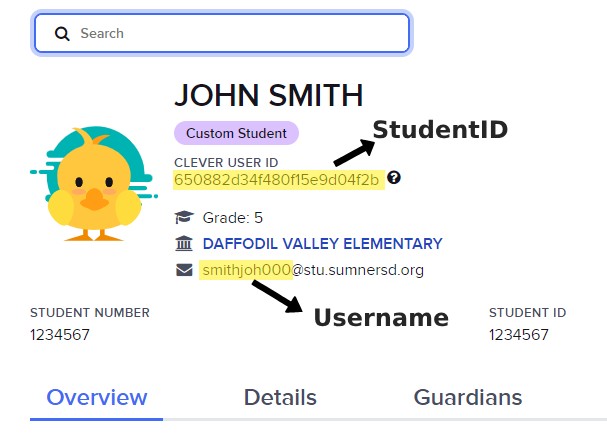
1. Search for the student in Clever
2. Extrapolate the student's Clever ID (StudentID field) and SBLSD username (Username field)
 |
3. Fill in the CSV template using data copied from Clever, then save the file.
 |
Upload the Student ID Fix File to myLexia
|
|
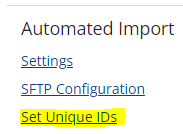
2. Under the Automated Import section, select Set Unique IDs
|
|
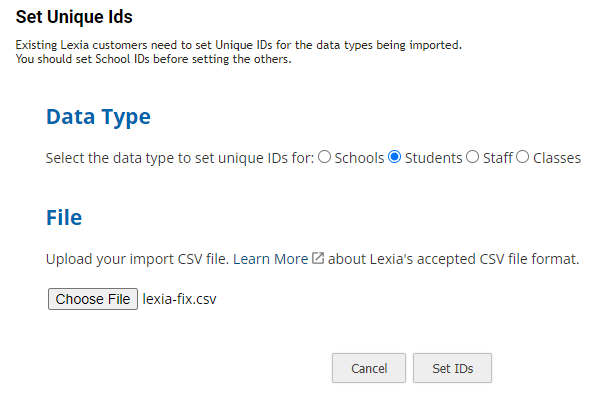
3. Select the Students data type, upload the CSV file you built, then click the Set IDs button
|
|
4. The student's account will be automatically restored and updated during the next Clever -> Lexia sync. You can optionally restore the student from the myLexia archive manually to get them instant access back to the Lexia apps, however their rosters will be outdated until the next sync.
SmartPass
Fixing Missing Student in SmartPass
Overview
SmartPass syncs student and staff accounts from Google OUs. There are some situations where a student's account may have manually been moved to a different OU and forgotten about over time (e.g. Google Only OU, Chromebook Take Home OU), making it so that SmartPass can't find their Google account.
Instructions
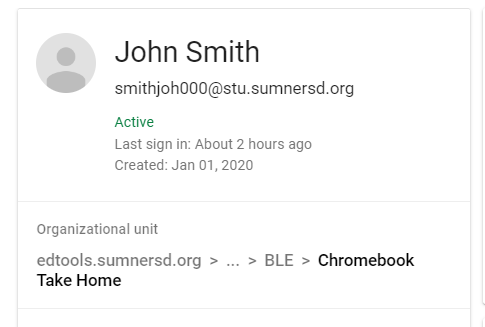
1. Confirm that the student is not in the expected Google OU. Their expected OU should reflect their primary location in RapidIdentity. In this case, the student currently attends a middle school, but they were manually moved into the 'Chromebook Take Home' OU when they were attending an elementary school.
|
|
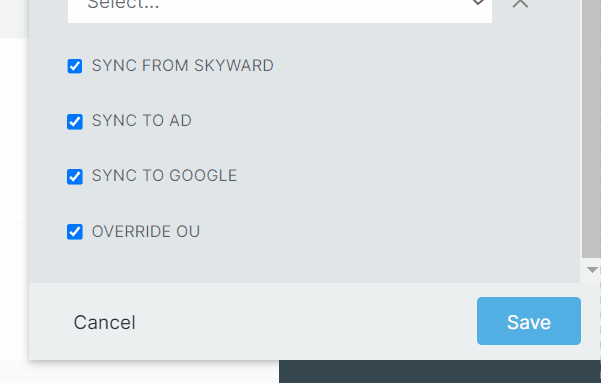
2. Disable the 'Override OU' flag on the student's RapidIdentity account, then save it. This will automatically recalculate the account's Google OU and move their account accordingly.
Ensure that the Sync To Google flag is enabled too
 |
3. SmartPass will now pull the student's Google account during the next scheduled sync (typically around 4PM).