# Technology Guides for Staff & Students
# ⚠️ Support Bulletins
Import notifications and updates from the Technology Services team regarding SBLSD systems.
# 2023.07.26 - RapidIdentity Maintenance
This maintenance period has ended
Technology Services will be implementing upgrades to the SBLSD account automation and sync pipelines in RapidIdentity between 7/28 - 7/29. This process may take between 12-24 hours.
#### Impacted Areas During the Upgrade Process
- **2FA**
- You might not receive a 2FA prompt (*only applies to users who have 2FA enabled*)
- **SSO**
- SSO to certain applications might not work correctly
- You should still be able to access Google services (*Gmail, Drive, Calendar, etc.*) without any interruptions
- **Account claiming**
- Claiming accounts may not work
- **Password resets**
- You may be unable to reset your password.
- **Account syncing**
- New accounts will not be provisioned
- Existing accounts will not be updated or synced
- **Group syncing**
- Changes to email group memberships will not be synced
- **Waivers system**
- Reviewers will be unable to access the waiver system admin panel
- Skyward data will be unavailable
- Student ID matching will not be performed when a waiver is submitted
- **Technology support**
- The Technology Services team will be unable to manually update accounts or change passwords until the upgrade is complete
# 2023.08.14 - Rostered Application Issues
This issue has been resolved as of 9/06/23
Technology Services is currently working with NWRDC to address a bug in Skyward that is causing an issue with staff and
student account exports. Expect additional syncing delays for rostered applications.
#### Updates
| ##### 9/06/23 11:20AM
---
- This issue has been resolved
##### 9/05/23 8:30AM
---
- Skyward believes they have identified the issue. We will be able to determine whether or not the fix works as expected tomorrow morning.
##### 8/21/23 8:13AM
---
- WSIPC has escalated the issue to Skyward for assistance
##### 8/18/23 8:40AM
---
- WSIPC has isolated the issue and is testing a fix
##### 8/15/23 9:05AM
---
- The issue appears to be impacting student account exports as well
##### 8/14/23 11:37AM
---
- NWRDC has escalated this issue to WSIPC
|
Some platforms may be receiving incorrect or outdated rosters and account information. Affected applications include:
- AgileMind
- Clever
- Amplify
- Cengage Online Resources
- DreamBox Math
- Formative
- Great Minds
- i-Ready
- IXL
- Lab Aids
- Lexia Core5
- Lexia English
- Lexia PowerUp
- McGraw Hill
- myLexia
- Pearson - aimswebPlus
- Remind
- Sapling Learning
- Savvas
- Sora by OverDrive
- SpringBoard
- Typing Agent
- Zearn
- Follett Destiny
- Google Classroom
- HMH
- PBISApps SWIS
- PeachJar
- Read180
- Securly
- WELNET - Focused Fitness
# 2023.09.28 - Skyward Outage
#### Updates
| ##### 9/28/23 5:03PM
---
- This issue has been resolved.
##### 9/28/23 9:57AM
---
- WSIPC has identified a probable cause for the outage and is working on a fix.
- This outage affects all Skyward SMS 2.0 districts in WA.
##### 9/28/23 9:57AM
---
- Skyward is currently experiencing an outage across all districts. The issue has been escalated to WSIPC.
|
# Account Automation
### **Core**
Core systems represent the basis for school district user accounts.
| **System** | **SSO** | **Rostering** | **Notes** |
| Active Directory |
| Y | Used for accessing school district PCs |
| Google | Y | Y | Used for district email, cloud storage, calendars, etc. |
| RapidIdentity | Y | Y | Used for SSO, 2FA, security, etc. |
### **Platforms**
The following platforms have custom SSO/rostering functionality provided via RapidIdentity.
| **System** | **SSO** | **Rostering** | **Notes** |
| Adobe | Y |
|
|
| AgileMind |
| Y |
|
| Clever | Y | Y |
|
| CogAT |
|
| \*Annual data extract |
| Blackboard | Y | Y |
|
| Follet Destiny | Y | Y |
|
| Google Classroom |
| Y |
|
| HMH | Y | Y |
|
| KACE | Y |
|
|
| MAP |
| Y | \*Data extracts automatically forwarded to another department which handles rostering manually |
| PBISApps SWIS |
| Y |
|
| PeachJar |
| Y |
|
| Read180/System44 |
| Y |
|
| Securly |
| Y |
|
| Versatrans |
| Y |
|
| WELNET - Focused Fitness | Y | Y |
|
| Zoom | Y |
|
|
### **Clever Applications**
Applications which are specifically accessible and rostered via Clever.
| **System** | **SSO** | **Rostering** | **Notes** |
| Amplify | Y | Y |
|
| Cengage Online Resources | Y |
|
|
| DreamBox | Y | Y |
|
| i-Ready | Y | Y |
|
| Imagine Language & Literacy | Y | Y | \*No data shared; pending implementation |
| IXL | Y | Y |
|
| Kuder Navigator | Y | Y |
|
| Lab Aids | Y |
|
|
| Lab-Aids Portal | Y | Y |
|
| Lexia Core5 | Y | Y |
|
| Lexia English | Y | Y |
|
| Lexia PowerUp | Y | Y |
|
| myLexia | Y | Y |
|
| NWEA MAP Growth |
| Y | \*No data shared; pending implementation |
| Pearson - aimswebPlus | Y | Y |
|
| Remind | Y | Y |
|
| Sapling Learning | Y | Y |
|
| Savvass EasyBridge | Y |
|
|
| Sora by OverDrive | Y |
|
|
| SpringBoard | Y | Y |
|
| Turnitin | Y |
| \*No data shared; pending implementation |
| Typing Agent | Y | Y |
|
| Zearn | Y | Y |
|
# Gmail
# How to Identify Phishing Emails
- [https://support.google.com/mail/answer/8253](https://support.google.com/mail/answer/8253 "https://support.google.com/mail/answer/8253")
# How to Report Phishing Emails
### Gmail Inbox
To use the PAB add-on in your online inbox, follow the instructions below.
1. Open an email and click on the PAB icon in the add-on menu.

#### Important
Make sure to use the PAB icon found in the add-on menu in your Google inbox. It is the phish hook icon located on the right side of your Google inbox.
2. Click the blue **Phish Alert** button to report the email.

3. Once the confirmation message appears, click the back arrow to go back to your inbox. Please note that the email will be moved to the Trash folder once you report the email.
**Note**: If you're viewing an email in split pane mode, the back arrow is not available. You can change your Gmail inbox settings to make the back arrow visible. You can also click **Inbox** or your browser's back arrow to go back to your inbox.
### Gmail Mobile
To use the PAB add-on from your mobile device, follow the instructions below.
1. On an open email, scroll to the bottom of the screen and locate the available add-ons section.
2. Click on the phish hook icon and scroll down to the bottom of the screen to access the PAB.

3. Click the blue **Report This Suspicious Email** button to report the email.

4. If enabled, you will see a confirmation message and the email will be moved to your Trash folder.

5. Click the back arrow to return to your inbox.
---
This will remove the suspicious email from your account and report it to the Networking Team and Google.
# Google Calendar
# Managing Google Calendar Membership
### **Requirements**
---
- A Google account which is an existing member of the calendar with the `owner` role.
### **Accessing Calendar Sharing Settings**
---
**1**. Access Google Calendar at [https://calendar.google.com/](https://calendar.google.com/)
**2**. Locate the "My calendars" section on the left side of the page.
**3**. Click the '**⋮**' button next to the name of the calendar you want to edit.
| [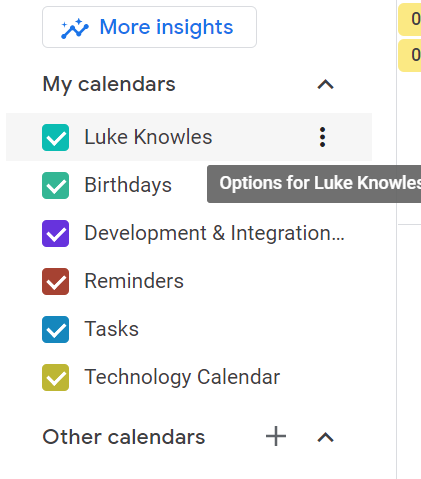](https://wiki.sumnersd.org/uploads/images/gallery/2022-07/image-1658863797503.png) |
**4**. When the pop-up menu appears, click the **Settings and sharing** option
**5**. Locate the **Share with specific people** section
#### **Adding Members**
**1**. Click the '**+ Add People**' button
**2**. Search for a user by their email address or name
**3**. Select the permission level that the new user should have
**4**. Click the **Send** button
The user will receive an email inviting them to join the calendar.
**1**. Locate the user you want to remove from the calendar
**2**. Click the '**✕**' button on the right side
| **[](https://wiki.sumnersd.org/uploads/images/gallery/2022-07/image-1658864273972.png)** |
**1**. Locate the user who you want to change permissions for
**2**. Open the drop-down box on the right side, then select a new permission level
| [](https://wiki.sumnersd.org/uploads/images/gallery/2022-07/image-1658864273972.png) |
| **Access permission**
| **Internal name**
| **What others can do**
|
| See only free/busy (hide details)
| `freeBusyReader`
| - Check when your calendar is booked and when it has free time, but not the names or details of your events.
|
| See all event details
| `reader`
| - Find details for all events except those marked as private.
- Find the time zone setting for the calendar.
- Subscribe to email alerts when events are created, changed, cancelled, RSVPed to, or coming up.
|
| Make changes to events
| `writer`
| - Find details for all events, including private ones.
- Add and edit events.
- Restore or permanently delete events from the calendar’s trash.
- Find the time zone setting for the calendar.
- Subscribe to email alerts when events are created, changed, cancelled, RSVPed to, or coming up.
|
| Make changes & manage sharing
| `owner`
| - Find details for all events, including private ones.
- Add and edit events.
- Restore or permanently delete events from the calendar’s trash.
- Find the time zone setting for the calendar.
- Change sharing settings.
- Subscribe to email alerts when events are created, changed, cancelled, RSVPed to, or coming up.
- Permanently delete the calendar.
|
---
### **Supplemental Documentation**
1. [https://support.google.com/calendar/answer/37082](https://support.google.com/calendar/answer/37082)
2. [https://support.google.com/calendar/answer/37100](https://support.google.com/calendar/answer/37100)
# Google Classroom
# LittleSIS Teacher Review
LittleSIS Teacher Review gives teachers the ability to opt-in to automated Google Classroom provisioning/rostering and provides functionality to more effectively manage automation of Google Classrooms.
Teacher Review can be accessed at [https://sync.littlesis.app/teacher-review](https://sync.littlesis.app/teacher-review). For the best experience, Teacher Review should be accessed from a computer with Google Chrome.
## Teacher Review Landing Page
---
[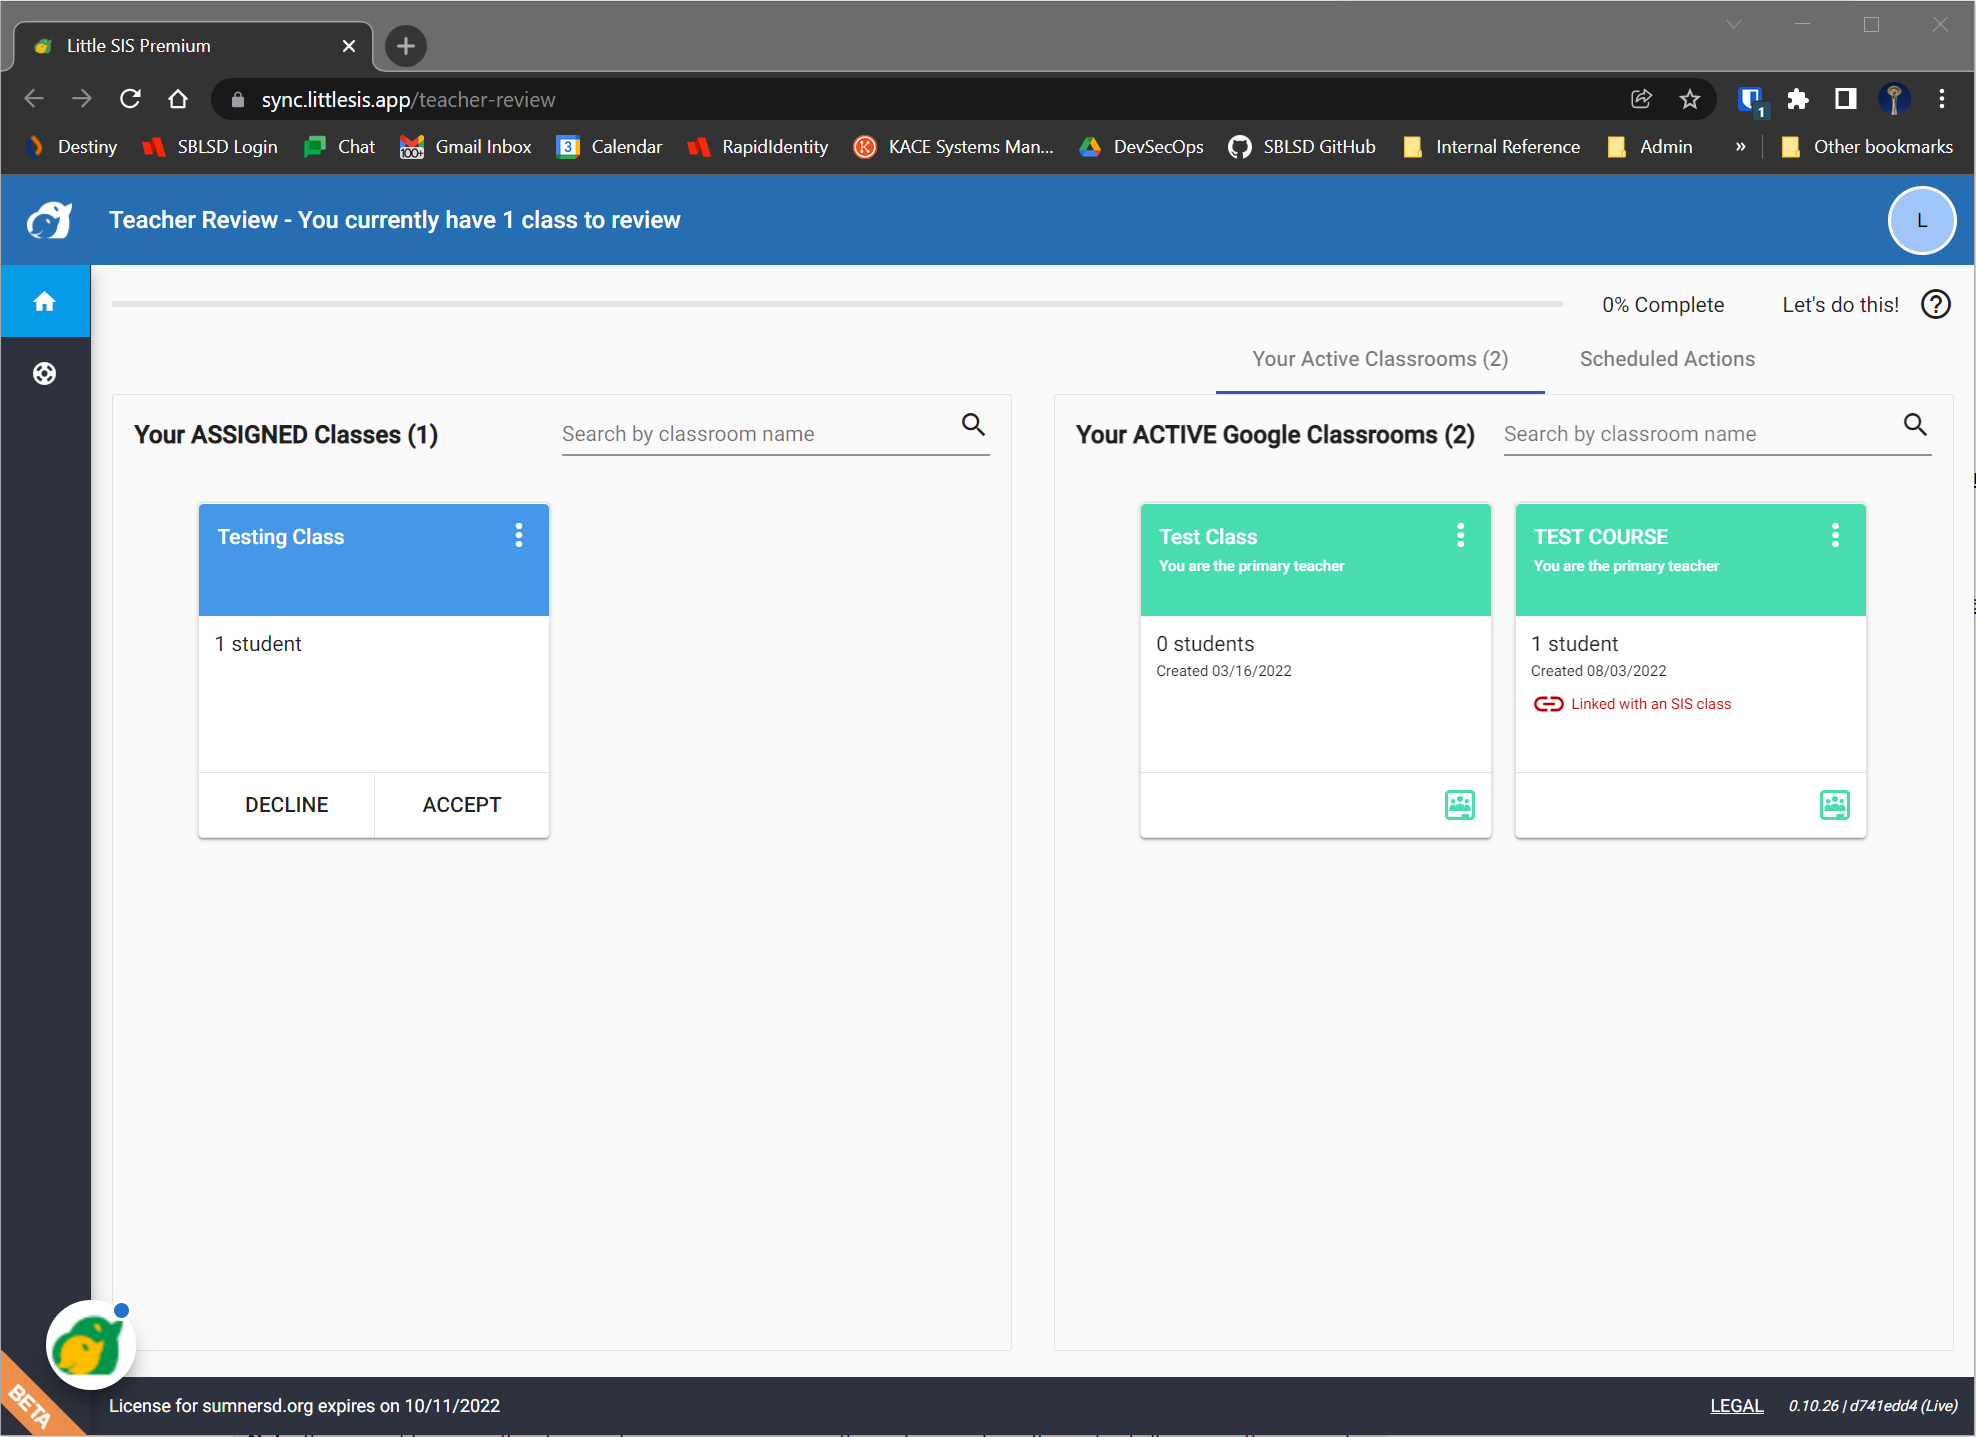](https://wiki.sumnersd.org/uploads/images/gallery/2022-08/image-1659548206876.png)
On the left side you will see invitations to automatically create and roster Google Classrooms for your classes during the upcoming semester.
On the right side, the **Your Active Classrooms** tab lists Google Classrooms which you already own, whether they were created manually or automatically. The **Scheduled Actions** tab is where you will finalize your decision to accept/decline any assigned classes.
You can verify the accuracy of your assigned class' rosters by clicking the [ ](https://wiki.sumnersd.org/uploads/images/gallery/2022-08/image-1659549323241.png) button on the top right of the class, then selecting the **View Roster** option.
[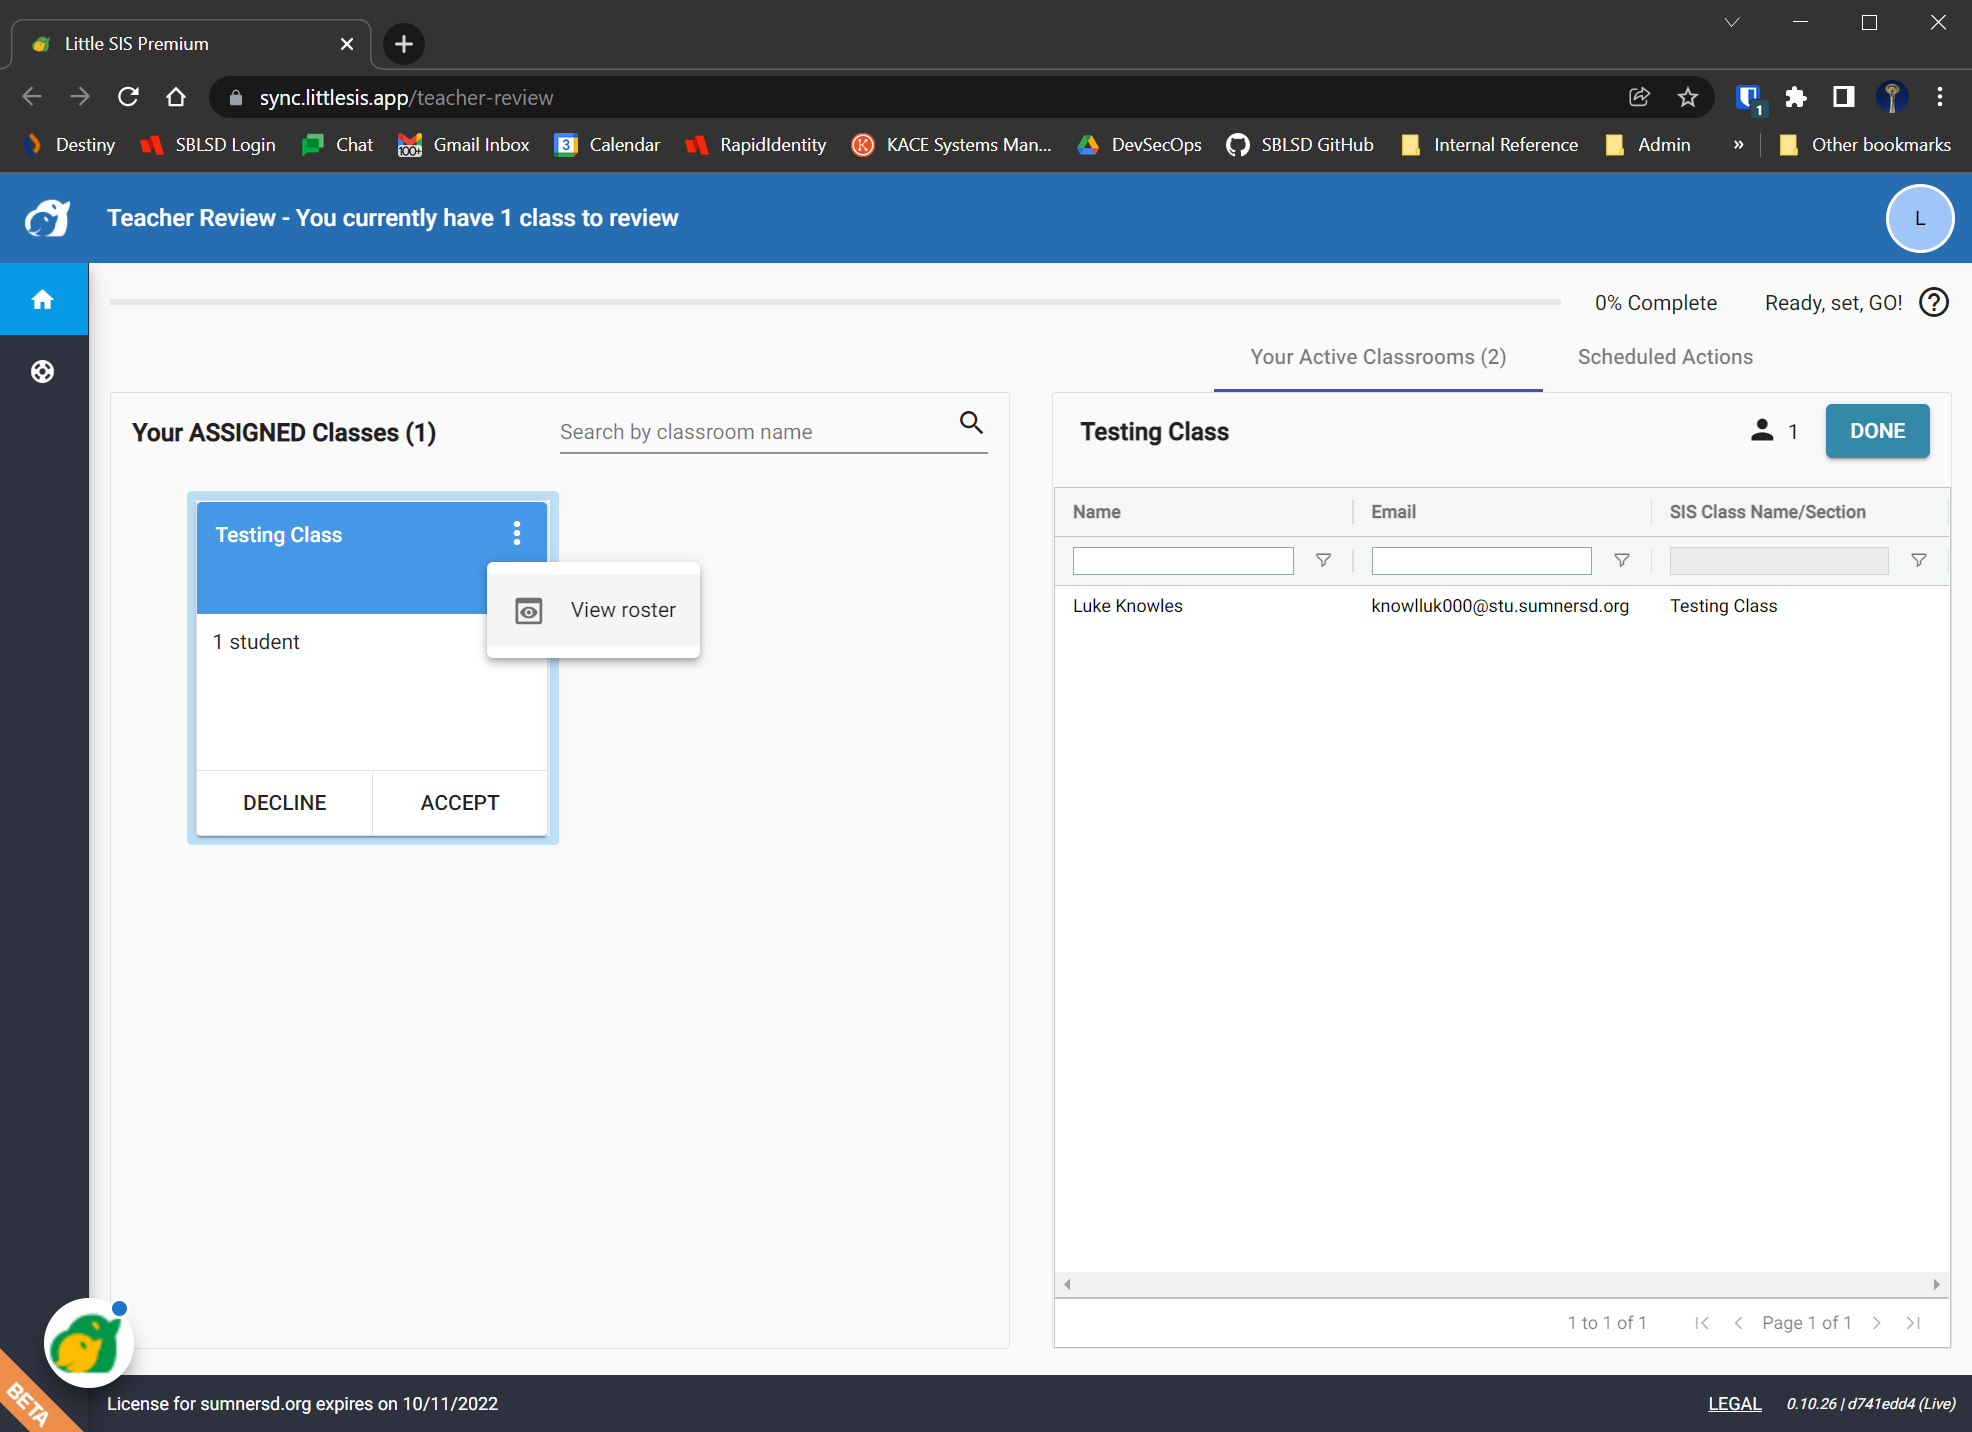](https://wiki.sumnersd.org/uploads/images/gallery/2022-08/image-1659549413154.png)
### Merging Assigned Classes
---
Due to technical limitations, it's possible that you may have an individual section which spans multiple terms (*or the duration of the school year*) but Teacher Review interprets the academic session in such a way that it proposes creating multiple unique Google classrooms for that section. If this occurs, you can simply merge multiple assigned classes into a single Google Classroom.
[https://amplifiedlabs.zendesk.com/hc/en-us/articles/4402182466451-Review-and-Merge-Assigned-Classes-With-Teacher-Review](https://amplifiedlabs.zendesk.com/hc/en-us/articles/4402182466451-Review-and-Merge-Assigned-Classes-With-Teacher-Review)
### Linking an Assigned Class to an Existing Google Classroom
---
If you have already started preparing a Google Classroom prior to receiving a Teacher Review invite, you can still opt-in to automated rostering without having to redo anything! To do so, you will simply link the Teacher Review assigned class to your existing Google Classroom.
[https://amplifiedlabs.zendesk.com/hc/en-us/articles/4402160354707-Link-a-SIS-Class-to-an-Existing-Active-Google-Classroom-Class](https://amplifiedlabs.zendesk.com/hc/en-us/articles/4402160354707-Link-a-SIS-Class-to-an-Existing-Active-Google-Classroom-Class)
### Accepting an Assigned Class
---
Accepting an assigned class will automatically provision and roster the Google Classroom using enrollment data from Skyward. The Google Classroom roster will be automatically synced with Skyward data every 24 hours throughout the academic session.
1. Click the **ACCEPT** button on the assigned class(es) on the left side of the page.
2. On the right side of the page, select the **Scheduled Actions** tab.
3. When you are ready to finalize your decision, click the **FINISH SCHEDULED ACTION** button in the **Scheduled Actions** tab on the left side of the page.
4. All accepted assigned classes will have their Google Classrooms created almost immediately. You can verify that the process succeeded by accessing [classroom.google.com](https://classroom.google.com/) while logged in to your SBLSD account.
### Declining an Assigned Class
---
Declining an assigned class will prevent a Google Classroom being automatically created or managed for that class. This is effectively an opt-out action.
**NOTE**: If you decline automatic provisioning/rostering, you will be responsible for manually creating your Google Classrooms and maintaining their rosters throughout the year.
1. Click the **DECLINE** button under the assigned class(es) on the left side of the page.
2. On the right side of the page, select the **Scheduled Actions** tab.
3. When you are ready to finalize your decision, click the **FINISH SCHEDULED ACTION** button in the **Scheduled Actions** tab on the left side of the page.
### Supplemental Reference
---
- [About Teacher Review](https://amplifiedlabs.zendesk.com/hc/en-us/articles/4402182359571-About-Teacher-Review)
- [Teacher Review - Help Center](https://amplifiedlabs.zendesk.com/hc/en-us/sections/1500002845801-Teacher-Review)
# Google Drive
# Google Groups
# Common Email Lists
#### Automated Membership Management
A '**✓**' in the "Managed" column indicates that users who match specific conditions are automatically added to the group, and are automatically removed from the group when they no longer match those conditions.
| **Address** | **Description** | **Managed** |
| adm\_staff@sumnersd.org |
| **✓**
|
| bhs\_staff@sumnersd.org |
| **✓**
|
| ble\_staff@sumnersd.org |
| **✓** |
| cwe\_staff@sumnersd.org |
| **✓** |
| dee\_staff@sumnersd.org |
| **✓** |
| dve\_staff@sumnersd.org |
| **✓** |
| ehe\_staff@sumnersd.org |
| **✓** |
| sumner\_early\_learning\_center\_staff@sumnersd.org |
| **✓** |
| administrative\_secretaries@sumnersd.org |
|
|
| apg\_staff@sumnersd.org |
| **✓** |
| apg\_fulltime\_staff@sumnersd.org |
| **✓** |
| apg\_parttime\_staff@sumnersd.org |
| **✓** |
| building\_registrars@sumnersd.org |
|
|
| business\_office@sumnersd.org |
|
|
| cabinet@sumnersd.org |
|
|
| central\_office-administrators@sumnersd.org |
|
|
| central\_office\_staff@sumnersd.org |
| **✓** |
| certificated\_staff@sumnersd.org |
| **✓** |
| cert\_sub\_staff@sumnersd.org |
| **✓** |
| child\_nutrition@sumnersd.org |
| **✓** |
| classified\_staff@sumnersd.org |
| **✓** |
| class\_sub\_staff@sumnersd.org |
| **✓** |
| coach\_staff@sumnersd.org |
| **✓** |
| confidential\_staff@sumnersd.org |
|
|
| counselors\_elementary\_schools@sumnersd.org |
|
|
| counselors\_middle\_schools@sumnersd.org |
|
|
| custodians@sumnersd.org |
| **✓** |
| drill@sumnersd.org |
|
|
| elementary\_admin@sumnersd.org |
| **✓** |
| ehs\_staff@sumnersd.org |
|
|
| fitness\_staff@sumnersd.org |
|
|
| head\_custodians@sumnersd.org |
|
|
| human\_resources@sumnersd.org |
|
|
| high\_school\_admin@sumnersd.org |
| **✓** |
| instructional\_services@sumnersd.org |
|
|
| iuoe\_260cust-maint-mech@sumnersd.org |
| **✓** |
| bus\_drivers\_staff@sumnersd.org |
| **✓** |
| child\_nutrition\_staff@sumnersd.org |
| **✓** |
| iuoe\_childnutrition-busdriver@sumnersd.org |
| **✓** |
| maintenance\_mechanic\_custodian\_staff@sumnersd.org |
| **✓** |
| iuoe\_school\_year\_custodian@sumnersd.org |
| **✓** |
| leadership\_staff@sumnersd.org |
| **✓** |
| leadership\_spda\_staff@sumnersd.org |
| **✓** |
| leadership\_sssda\_staff@sumnersd.org |
| **✓** |
| leadership\_team@sumnersd.org |
|
|
| maintenance@sumnersd.org |
| **✓** |
| middle\_school\_admin@sumnersd.org |
| **✓** |
| principals@sumnersd.org |
| **✓** |
| psychologists@sumnersd.org |
|
|
| research\_assessment@sumnersd.org |
|
|
| sblea\_staff@sumnersd.org |
| **✓** |
| school\_board@sumnersd.org |
|
|
| school\_board\_staff@sumnersd.org |
|
|
| see\_staff@sumnersd.org |
| **✓** |
| spa\_health\_tech-lpn\_staff@sumnersd.org |
| **✓** |
| spa\_staff@sumnersd.org |
| **✓** |
| spda\_staff@sumnersd.org |
| **✓** |
| substitutes@sumnersd.org |
| **✓** |
| transportation\_staff@sumnersd.org |
| **✓** |
| lms\_staff@sumnersd.org |
| **✓** |
| lre\_staff@sumnersd.org |
| **✓** |
| mle\_staff@sumnersd.org |
| **✓** |
| mms\_staff@sumnersd.org |
| **✓** |
| shs\_staff@sumnersd.org |
| **✓** |
| sms\_staff@sumnersd.org |
| **✓** |
| dontuse\_district\_staff@sumnersd.org |
| **✓** |
| the\_staff@sumnersd.org |
| **✓** |
| vfe\_staff@sumnersd.org |
| **✓** |
# Managing Google Group Membership
### **Requirements**
---
- A Google account which is an existing member of the group with either the `Owner` or `Manager` role.
### **Accessing the Group Membership List**
---
**1**. Access Google Groups at [https://groups.google.com/](https://groups.google.com/)
**2**. Locate the group you want to manage and click the "**⚙**" (Group settings) button
| [](https://wiki.sumnersd.org/uploads/images/gallery/2022-07/image-1658872149518.png) |
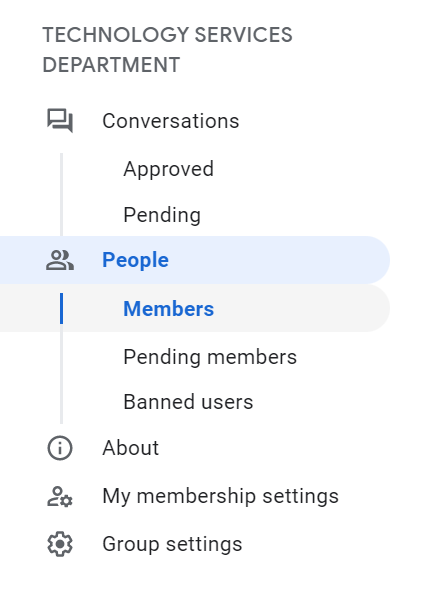
**3**. Select the **People** > **Members** option from the menu on the left
| [](https://wiki.sumnersd.org/uploads/images/gallery/2022-07/image-1658872327340.png) |
#### **Adding Members**
**1**. Click the [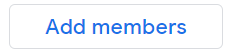](https://wiki.sumnersd.org/uploads/images/gallery/2022-07/image-1658872516324.png) button at the top of the page
**2**. In the pop-up window, search for users to add as members, manager, or owners. You can add multiple users to the group at the same time.
**3**. Click the **Add Members** button at the bottom of the pop-up window to finish.
**1**. Hover over the profile icon of each user you intend to delete and select the checkbox that appears
**2**. Once one or more users are selected, select the "**⊝**" button near the top right of the page
| [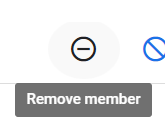](https://wiki.sumnersd.org/uploads/images/gallery/2022-07/image-1658872840596.png) |
**3**. Click the **Ok** button in the pop-up window that appears
| [](https://wiki.sumnersd.org/uploads/images/gallery/2023-08/9Jxv53SFGJuUp8V2-managing-google-group-perms.gif) |
**1**. Click on the role dropdown of the user who you want to update permissions for
**2**. Select a new role for the user (*Owner, Manager, or Member*)
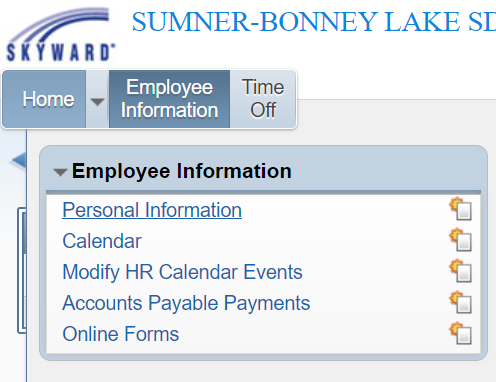
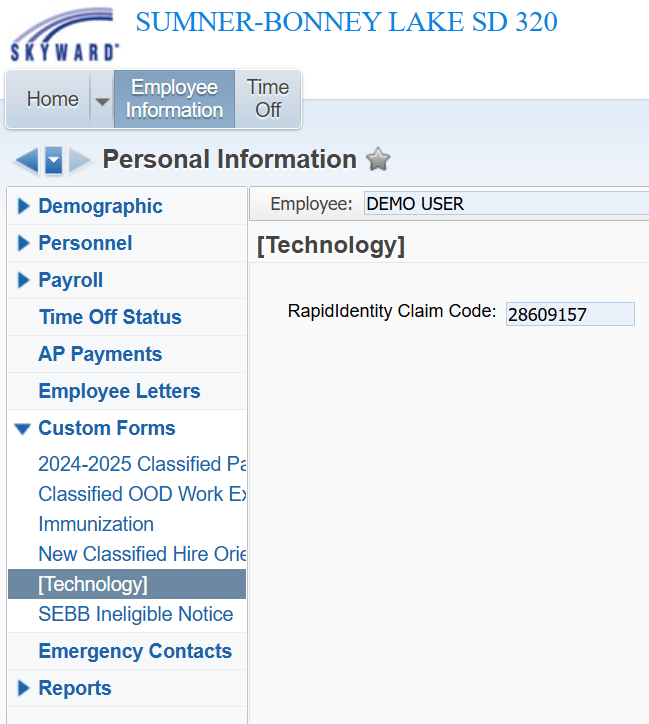
1. Login to [Skyward](https://www2.nwrdc.wa-k12.net/scripts/cgiip.exe/WService=wsumners71/seplog01.w) and go to Employee Access
2. Click on **Employee Information** > **Personal Information**
[](https://wiki.sumnersd.org/uploads/images/gallery/2025-05/4YcCdqR7DwCPYAFu-image.png)
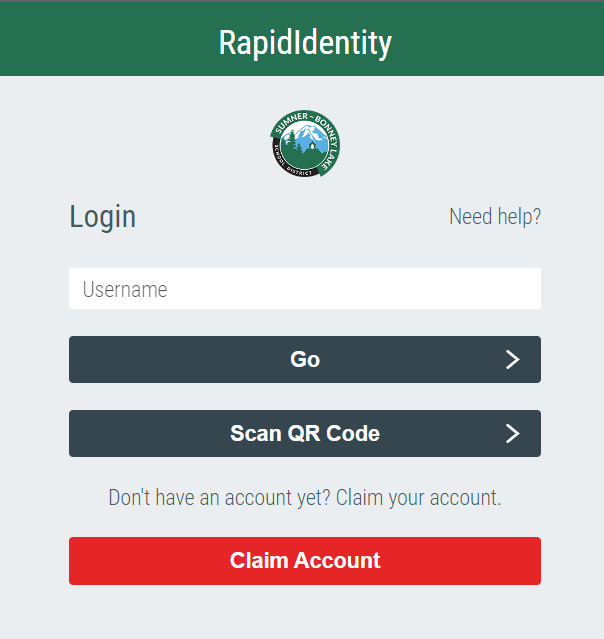
3. Click on **Custom Forms** > **\[Technology\]**. Your RapidIdentity claim code is displayed in the form.
[](https://wiki.sumnersd.org/uploads/images/gallery/2025-05/qACrOYLnrXFVWbzh-image.png)
For students, the claim code is your student ID with leading zeroes if your ID is under 8 characters long. For example:
| **Student ID** | **Claim Code** |
| 0123456 | 00123456 |
| 1234567 | 01234567 |
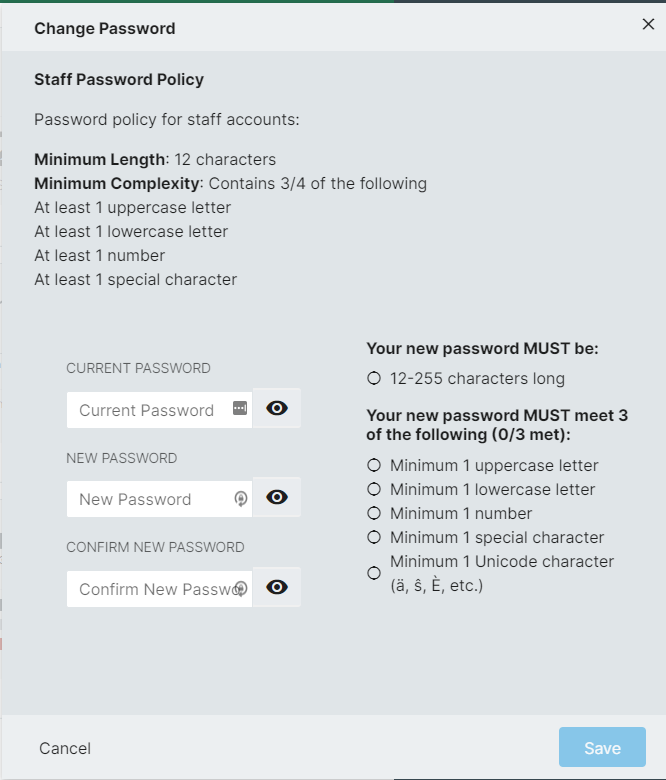
| **Students** | Minimum Length
- >= 8 characters
|
| **Staff** | Minimum Length
- >= 12 characters
At least 3 of the following:
- Minimum 1 uppercase letter
- Minimum 1 lowercase letter
- Minimum 1 number
- Minimum 1 special character
|
###
### **Claiming Your Account**
---
#### Windows
**1.** Open the Chrome browser
**2.** Navigate to [https://sblsd.us001-rapididentity.com/](https://sblsd.us001-rapididentity.com/)
**3.** At the RapidIdentity login screen, click the **Claim Account** button.
| [](https://wiki.sumnersd.org/uploads/images/gallery/2022-09/image-1664399207560.png)
|
**4**. Click on the dropdown list and select the claim policy that applies to you, then click the **Next** button
| [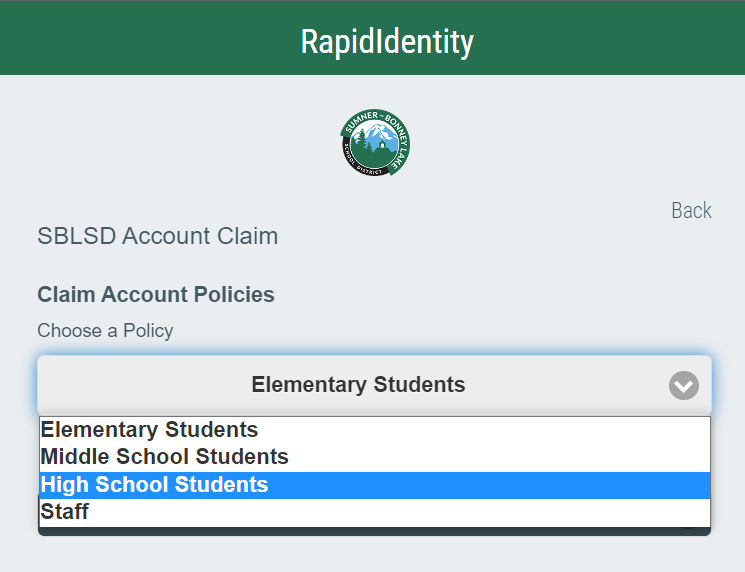](https://wiki.sumnersd.org/uploads/images/gallery/2022-09/image-1664399653376.png)
|
**5.** On the following page, enter your email address and claim code. Agree to the Acceptable Use Policy, then click the **Next** button
| [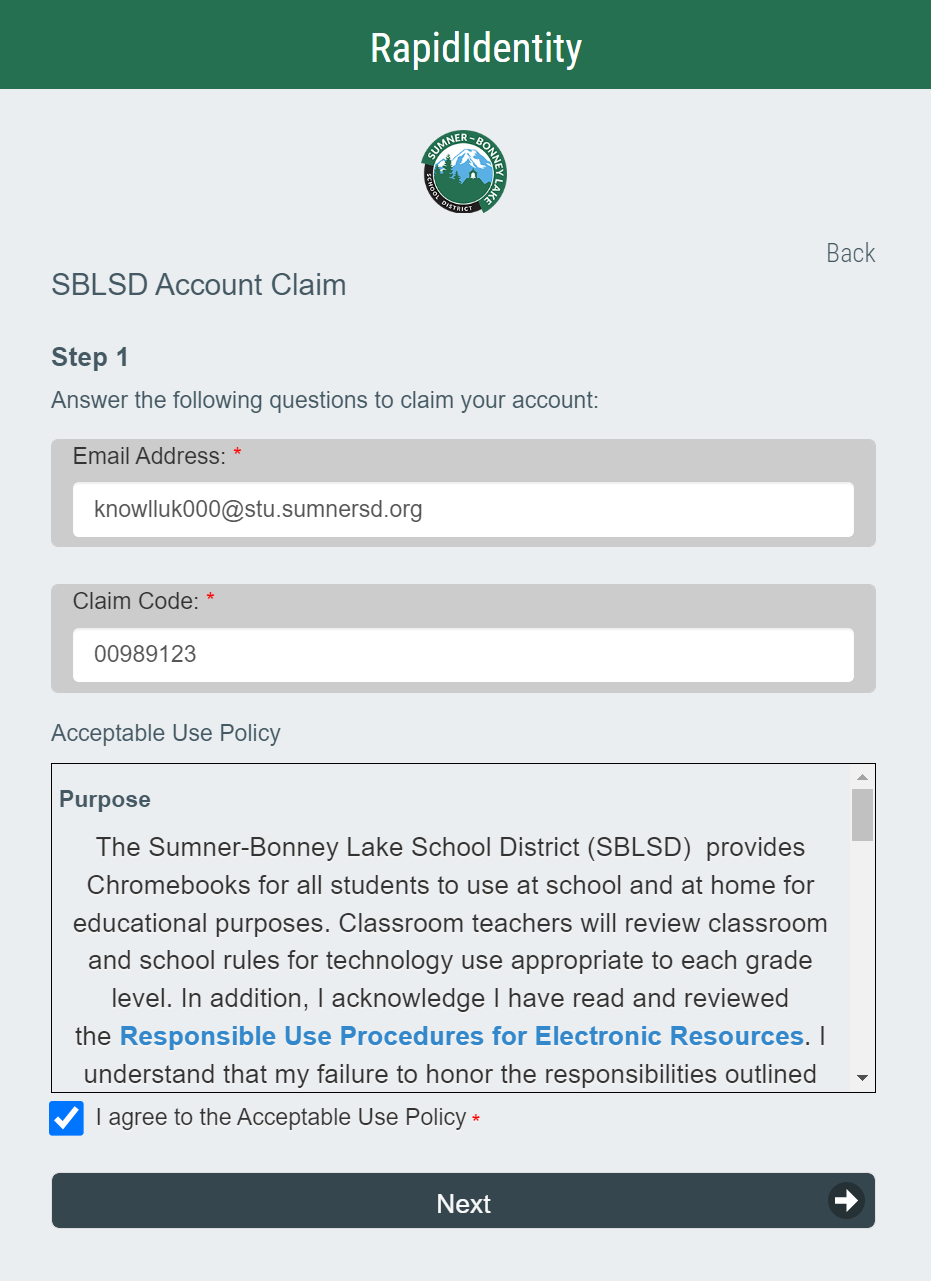](https://wiki.sumnersd.org/uploads/images/gallery/2022-09/image-1664399931925.png)
|
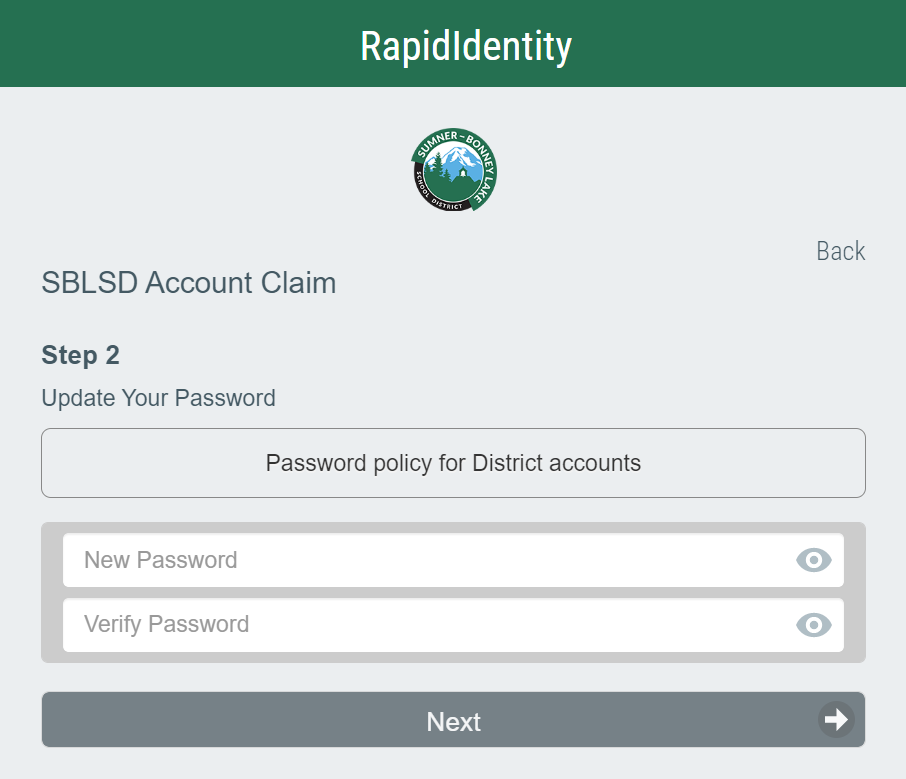
**6.** Set your new password (*refer to the New Password Requirements section for the minimum requirements*), then click the **Next** button. This will be the password you use to log in to RapidIdentity, Google, and SBLSD Windows devices going forward.
| [](https://wiki.sumnersd.org/uploads/images/gallery/2022-09/image-1664400133664.png)
|
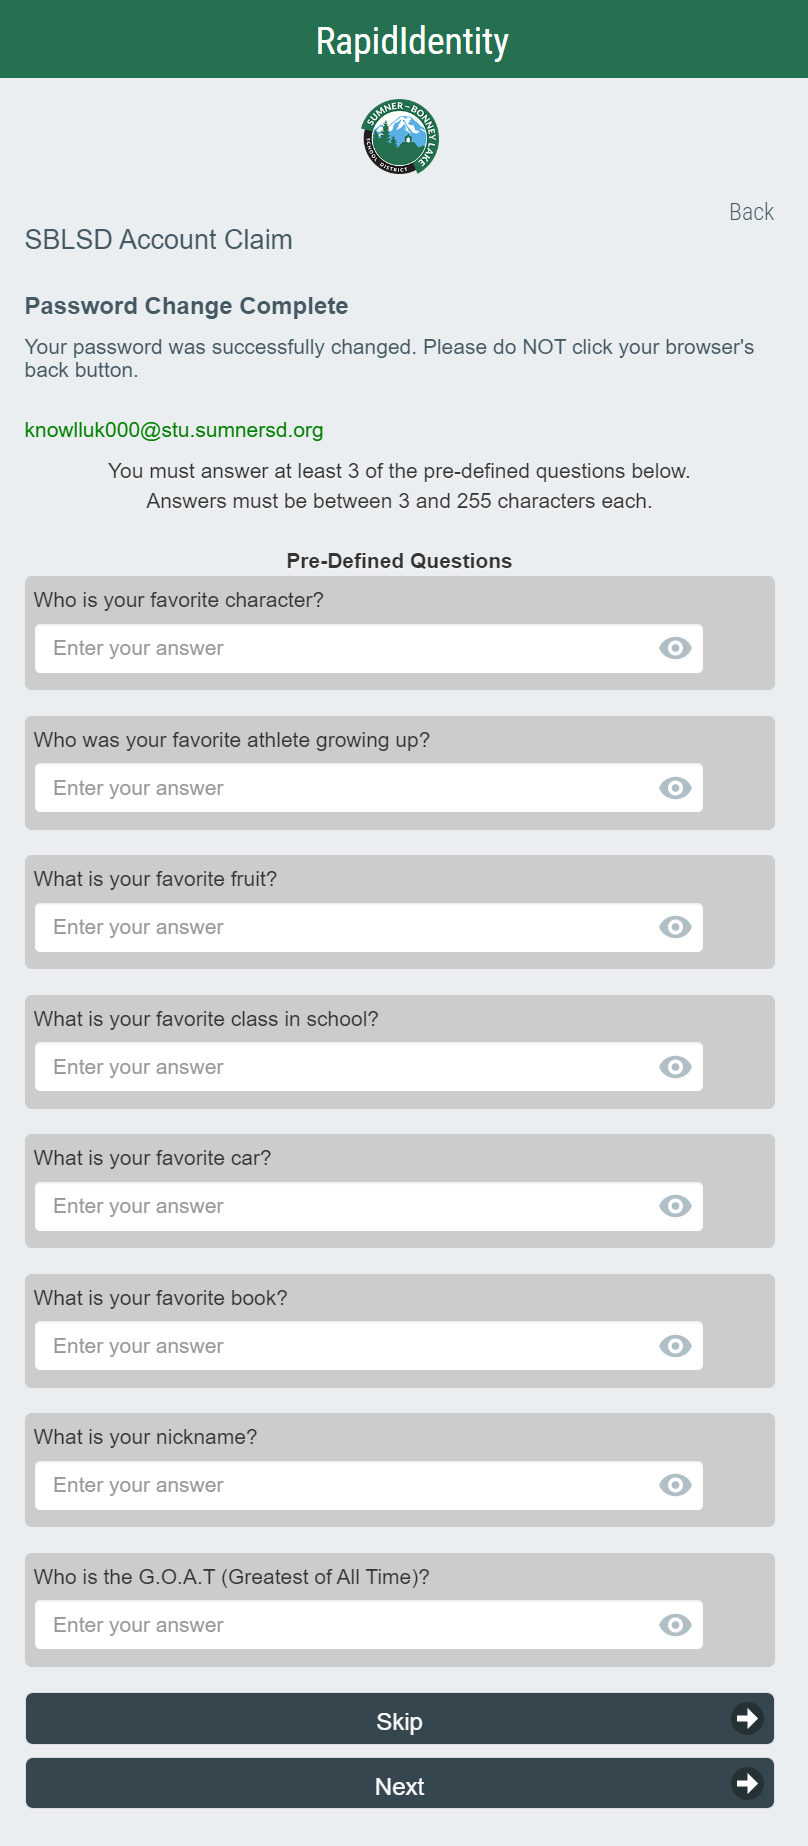
**7.** (*Optional, but recommended*) Set answers to at least 3 challenge questions, then click the **Next** button. If you would prefer to set challenge questions later, click the **Skip** button.
| [](https://wiki.sumnersd.org/uploads/images/gallery/2022-09/image-1664400294970.png)
|
**1.** On the ChromeOS login screen, click the **Add Person** button located near the bottom left of the screen.
**2.** If prompted by a white message box, click **Next**
**3.** Proceed from step 3 of the instructions in the Windows section.
| **Students** | Minimum Length
- >= 8 characters
|
| **Staff** | Minimum Length
- >= 12 characters
At least 3 of the following:
- Minimum 1 uppercase letter
- Minimum 1 lowercase letter
- Minimum 1 number
- Minimum 1 special character
|
# How To Setup 2FA
**These instructions have been migrated to the Technology Services department's new documentation platform. Please [refer to this link](https://sumnersd.getoutline.com/s/abe5eea0-fa4e-4a5b-b1fc-6a1f946373aa/doc/mfa-Zyjp8eqFiQ) for up-to-date instructions and information regarding MFA. The content on this page is no longer maintained and will be removed in the near future.**
### **Two-Factor Authentication Methods**
---
The Technology Services department officially recommends the **TOTP** method for staff - we consider it the most balanced option in terms of security and convenience
| **Name** | **Description** | **Requirements** |
| **SMS** | A temporary code is delivered to your phone via text message | - A mobile phone
- A mobile phone number entered in your RapidIdentity profile
|
| **⭐ TOTP** (*time-based one-time password*) | A temporary code which is continuously generated by an app on your phone | - A mobile phone
- An authenticator app such as Google Authenticator installed on your phone
|
| **WebAuthn** | A USB security key which is plugged in to your device | - A physical hardware key, such as a YubiKey
|
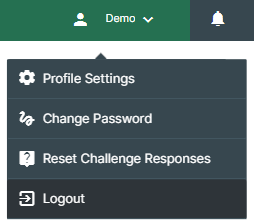
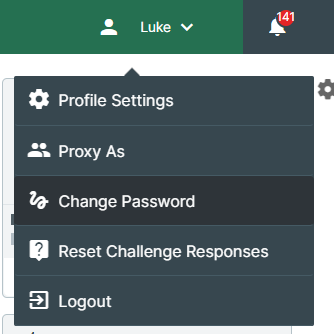
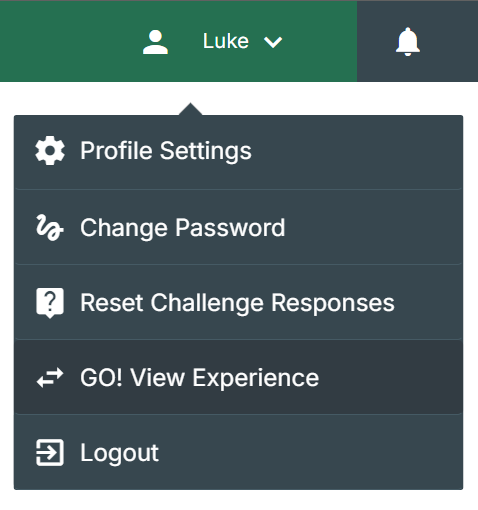
### **How to Edit Your RapidIdentity Profile**
---
| **1**. Log in to [RapidIdentity](https://sblsd.us001-rapididentity.com/)
**2**. Click on your name in the top-right corner
**3**. Select **Profile Settings** from the dropdown
**4**. Click the **Edit** button
**5**. Make any changes according to the instructions for your preferred authentication method below
**6**. Click the **Save** button
| [](https://wiki.sumnersd.org/uploads/images/gallery/2024-05/szPC10qo6Wkgl0pS-wiki-mfa.gif) |
### **Authentication Method Setup Instructions**
---
#### **TOTP**
TOTP Instructions
**1**. Select **TOTP** from the **Authentication Method** dropdown, then click the **Save** button
[](https://wiki.sumnersd.org/uploads/images/gallery/2024-05/gxX0J7nsLj74uThu-wiki-mfa-authentication-method-totp.gif)
**2**. Log out of RapidIdentity, then log back in
[](https://wiki.sumnersd.org/uploads/images/gallery/2024-05/FbarjhgzL9gbRiHR-image.png)
**3**. After entering your credentials, you will receive the following prompt
[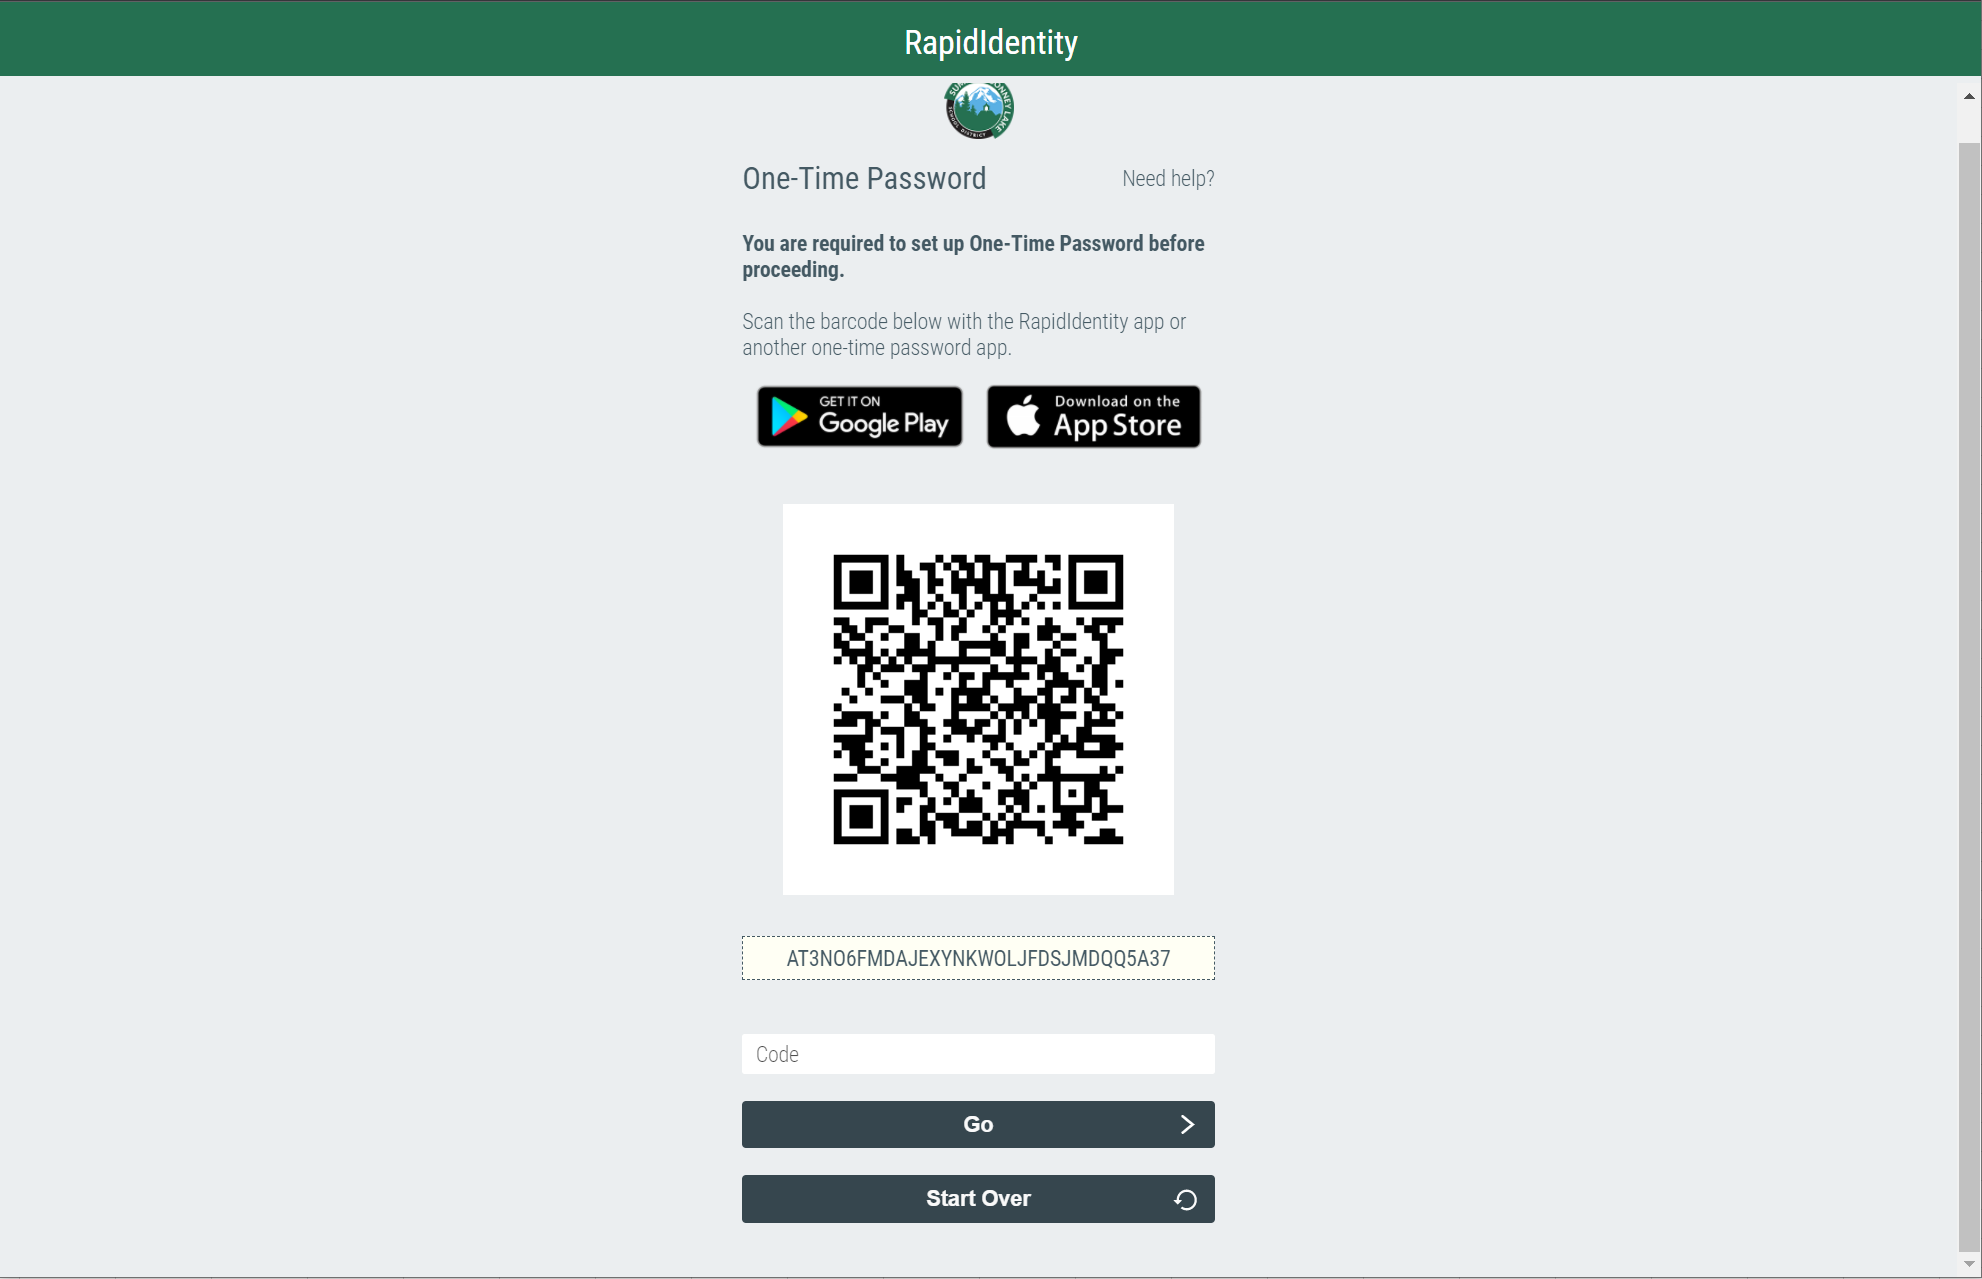](https://wiki.sumnersd.org/uploads/images/gallery/2022-08/image-1659645650053.png)
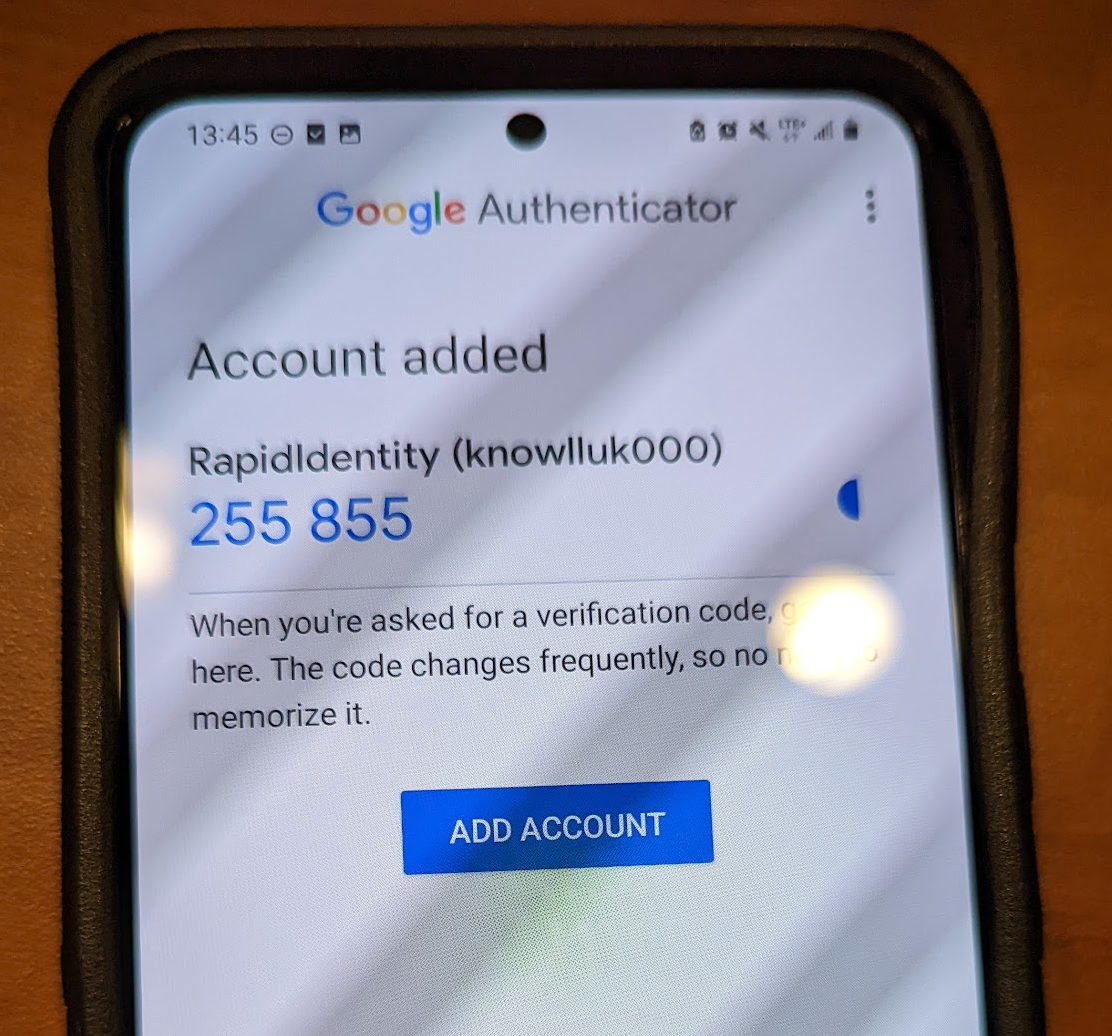
**4**. Open the Google Authenticator app on your phone. Select the **Scan a QR code** option, then scan the QR code displayed by RapidIdentity
**5**. Google Authenticator will add the account and begin generating one time codes
[](https://wiki.sumnersd.org/uploads/images/gallery/2022-08/image-1659646073387.png)
**6**. In RapidIdentity, type in the code with is currently shown by Google Authenticator, then click the **Go** button
[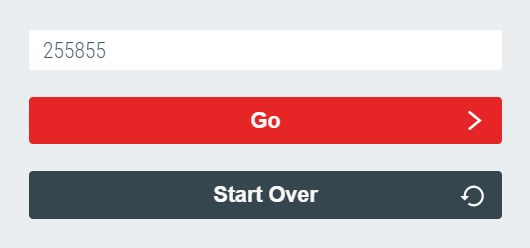](https://wiki.sumnersd.org/uploads/images/gallery/2022-08/image-1659646158354.png)
**7**. Success! Now you will be prompted to enter a code from Google Authenticator when you log in to RapidIdentity
SMS Instructions
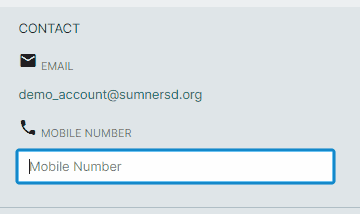
**1.** Update the **Mobile Number** field near the top of your profile. Ensure it is an up-to-date number where you will be receiving your one-time code.
[](https://wiki.sumnersd.org/uploads/images/gallery/2024-05/uxWiPSKdW6QvEoAd-wiki-mfa-sms-attribute.gif)
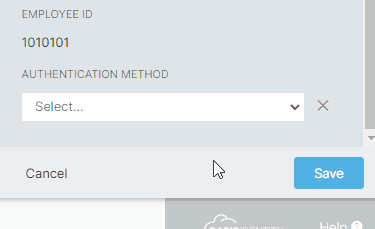
**2**. Select **SMS** from the **Authentication Method** dropdown, then click the **Save** button
[](https://wiki.sumnersd.org/uploads/images/gallery/2024-05/KtR1hCjd2xwCed0K-wiki-mfa-authentication-method-sms.gif)
**3**. Log out of RapidIdentity, then log back in
[](https://wiki.sumnersd.org/uploads/images/gallery/2024-05/FbarjhgzL9gbRiHR-image.png)
**4** . After entering your credentials, you will receive the prompt below
[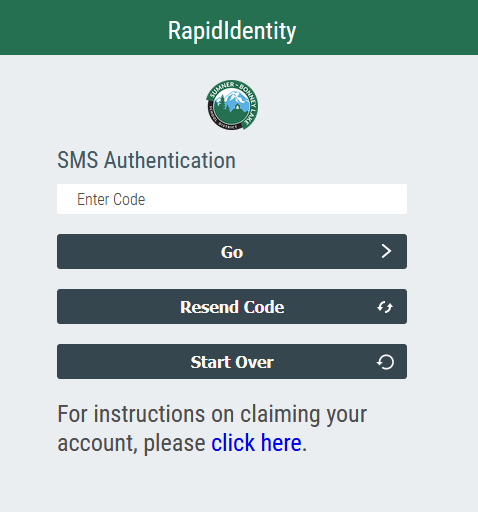](https://wiki.sumnersd.org/uploads/images/gallery/2022-11/FXBHCZvNIeT1l2az-image-1668810219130.png)
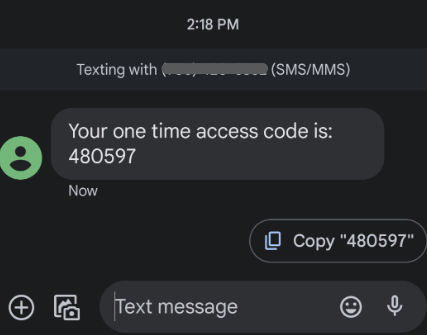
**5.** Open your cell phone and view your text messages. You should receive a message immediately after seeing the screen above. Enter the code provided into the SMS Authentication box shown previously. **This is a one-time access code that can not be reused. You will receive a new code every time you log in.**
[](https://wiki.sumnersd.org/uploads/images/gallery/2022-11/rXJqJ2YNsIaRbk3t-image-1668811850705.png)
**6**. Success! You will now be prompted for an access code when you log in to RapidIdentity
WebAuthn Windows Instructions
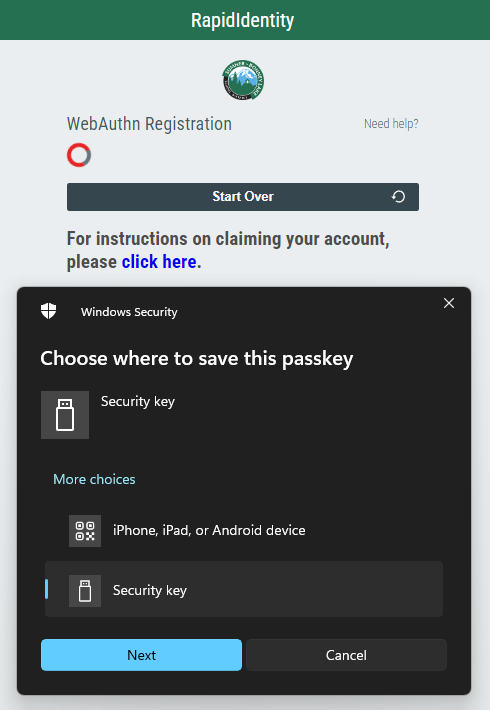
**1**. Select **WebAuthn** from the **Authentication Method** dropdown, then click the **Save** button
[](https://wiki.sumnersd.org/uploads/images/gallery/2024-05/PGKms22jeVxdoBzK-wiki-mfa-webauthn-attribute.gif)
**2**. Log out of RapidIdentity, then log back in
[](https://wiki.sumnersd.org/uploads/images/gallery/2024-05/FbarjhgzL9gbRiHR-image.png)
**3**. After entering your credentials you should receive the following prompt
[](https://wiki.sumnersd.org/uploads/images/gallery/2024-05/rB5P2Avq53xvi9Jf-mfa-webauthn-setup-prompt.png)
**4**. Plug your YubiKey in to a free USB port on your device
| **5**. Select the **Security Key** option on the *Choose where to save this passkey* prompt
**6**. Click the **Next** button
**7**. Click the **OK** button on the *Security key setup* prompt
**8**. Touch the button on your YubiKey
**9**. Click the **OK** button on the *Passkey saved* prompt
**10**. Success! Now you will be prompted to insert and tap your YubiKey when you log in to RapidIdentity
| [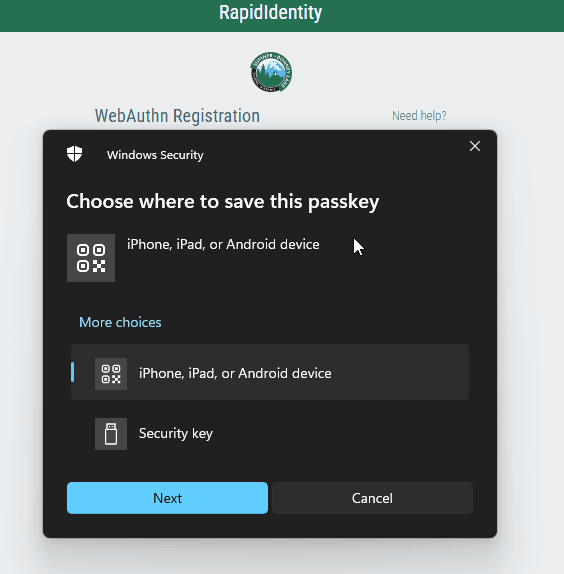](https://wiki.sumnersd.org/uploads/images/gallery/2024-05/eTaIe9bin3V8SalM-wiki-mfa-webauthn-prompts.gif) |
| [](https://wiki.sumnersd.org/uploads/images/gallery/2023-01/zw7UlStqNwufADFE-image.png)
|
**4**. Follow the prompt to set a new password
| [](https://wiki.sumnersd.org/uploads/images/gallery/2023-01/t9VtAXTA00JUVO8b-image.png)
|
**5**. Click the **Save** button
#### **If You Are Unable To Login**
---
**1**. Go to the RapidIdentity login page
**2**. Click the **Need help?** link above the username field
| [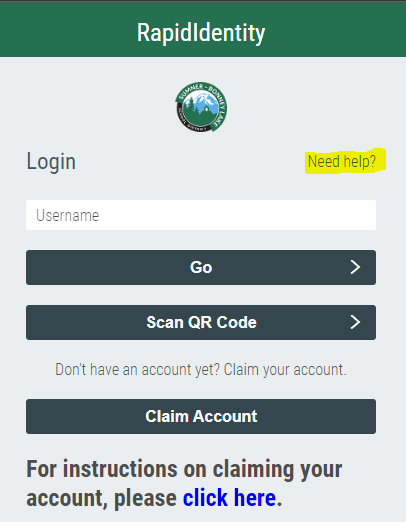](https://wiki.sumnersd.org/uploads/images/gallery/2023-01/Ea0KkT1z9ltN8LcP-image.png)
|
**3**. Click the **Forgot My Password** button
| [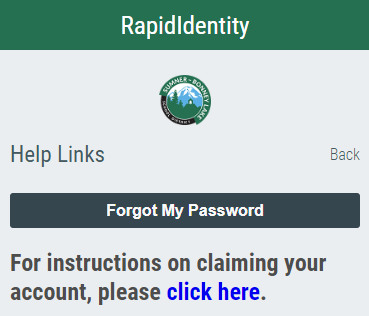](https://wiki.sumnersd.org/uploads/images/gallery/2023-01/wWQkMgnsgP6SPWay-image.png)
|
**4**. Follow the prompt to set your new password
# How to Print Login QR Badges For Students
**These instructions have been migrated to the Technology Services department's new documentation platform. Please [refer to this link](https://sumnersd.getoutline.com/s/abe5eea0-fa4e-4a5b-b1fc-6a1f946373aa/doc/generating-login-qr-badges-x05OkGeTwN) for up-to-date instructions and information regarding printing login QR badges. The content on this page is no longer maintained and will be removed in the near future.**
#### Requirements
---
1. One of the following RapidIdentity roles: `District QR Badge Manager`, `Building Account Manager`
#### Instructions
---
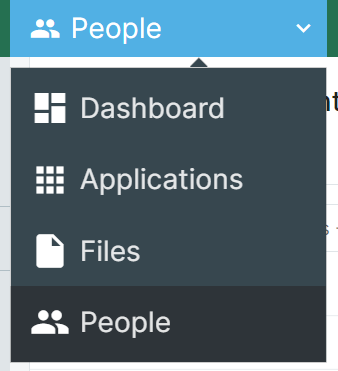
**1**. Log in to [RapidIdentity](https://sblsd.us001-rapididentity.com/)
**2**. Navigate to the **People** module
| [](https://wiki.sumnersd.org/uploads/images/gallery/2023-08/FrsYR6RrruCBXtNm-image.png)
|
**3**. Select one of the following profile views depending on your access level: `All Students - QR` or `My Building's Students`
| [](https://wiki.sumnersd.org/uploads/images/gallery/2023-08/VEj877YGMBBoUlY6-image.png)
|
**4**. Search for the student you want to print a QR badge for. You can search by name, username, email, grade level, or student ID.
Wildcard searches are supported using the `*` character. For example:
- To search for students who have the word "Tim" in their name, search for `*tim*`
- To search for students whose name begins with "Tim", search for `tim*`
- To search for students whose name ends with "othy", search for `*othy`
All other searches must be an **exact** match on a field. Searching for `tim` will not return any students named "Timothy".
**5**. Right click on the student result and click the **Generate QR Code** option from the context menu
| [](https://wiki.sumnersd.org/uploads/images/gallery/2023-08/tJHAf9wxHDc96CPG-image.png)
|
**6**. Select the **QR Login** option, then click the **View** button
| [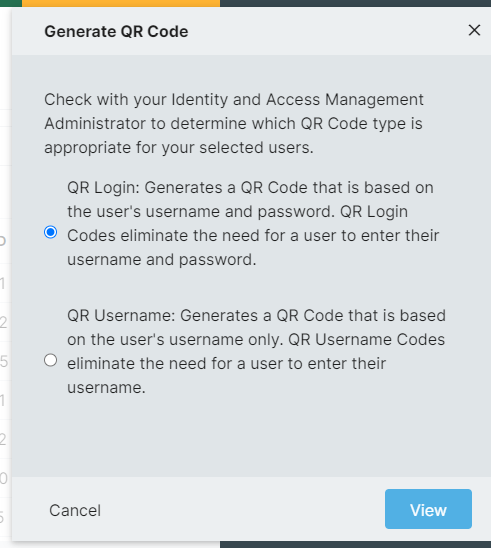](https://wiki.sumnersd.org/uploads/images/gallery/2024-02/9Eqz6ZFSzoRmXvq9-image.png)
|
**7.** RapidIdentity will open a new page with the generated QR code. From here you can adjust the layout of the QR badge (*if needed*) and print it.
| [](https://wiki.sumnersd.org/uploads/images/gallery/2023-08/8IpcKxndw6WqiCqS-image.png)
|
# How to Manage Student Accounts
**These instructions have been migrated to the Technology Services department's new documentation platform. Please [refer to this link](https://sumnersd.getoutline.com/s/abe5eea0-fa4e-4a5b-b1fc-6a1f946373aa/doc/managing-student-accounts-XSfChZMaax) for up-to-date instructions and information regarding student account management. The content on this page is no longer maintained and will be removed in the near future.**
#### Requirements
---
1. One of the following RapidIdentity roles: `District QR Badge Manager`, `Building Account Manager`
2. OR be the primary teacher of a class with active student enrollments
#### Searching For Student Accounts
---
**1**. Log in to [RapidIdentity](https://sblsd.us001-rapididentity.com/)
**2**. Navigate to the **People** module
| [](https://wiki.sumnersd.org/uploads/images/gallery/2023-08/FrsYR6RrruCBXtNm-image.png)
|
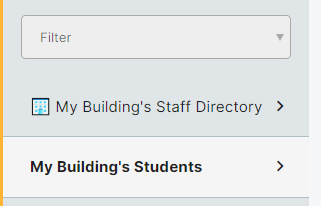
**3**. Select one of the following profile views depending on your access level
| **Profile View Name** | **Description** | **Requirement** |
| `All Students - QR`
| This view is exclusively used at the district level for managing QR badges. Returns all students.
| `District QR Badge Manager` role.
|
| `🏫 My Building's Students`
| This view is intended for use by building administrators and librarians. It will show students who share a common location assignment with you.
| `Building Account Manager` role.
|
| `🎓 My Students`
| This view is intended for use by teachers. It will show students who are enrolled in your class(es).
| 1. Be the primary teacher of a Skyward class with at least 1 active student enrollment
|
| [](https://wiki.sumnersd.org/uploads/images/gallery/2023-09/viB7ZwPsL4pyBclT-image.png)
|
**4**. Search for a student. You can search by name, username, email, grade level, primary location, or student ID.
| Wildcard searches are supported using the `*` character. For example:
- To search for students who have the word "Tim" in their name, search for `*tim*`
- To search for students whose name begins with "Tim", search for `tim*`
- To search for students whose name ends with "othy", search for `*othy`
All other searches must be an **exact** match on a field. Searching for `tim` will not return any students named "Timothy".
|
#### Viewing Account Details
---
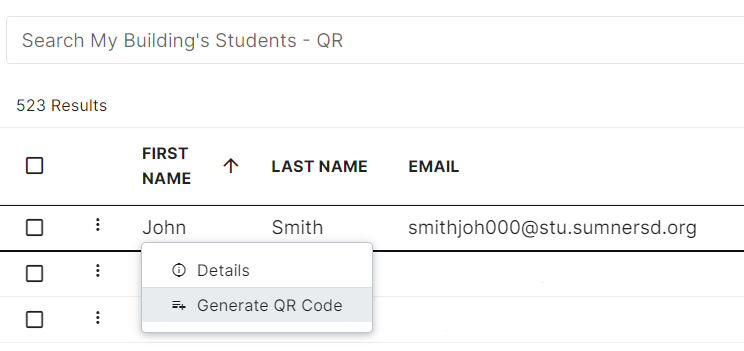
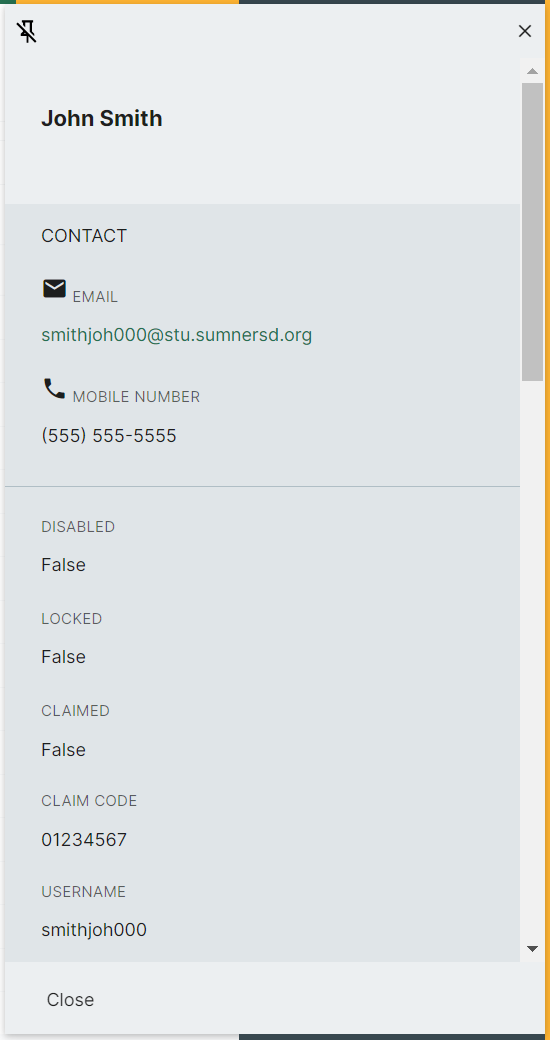
**1**. Right click on a student result and click the **View Details** option from the context menu
The information available for student accounts includes their name, home phone number, email, username, account status flags (*disabled, locked, claimed*), grade, locations, teachers, classes, and more.
| [](https://wiki.sumnersd.org/uploads/images/gallery/2023-09/4jwU06VsVkRbOGgP-image.png)
|
**2**. When you are finished, click the **Close** button in the bottom-left of the details pane. Optionally, you can keep the details pane open while browsing results by clicking the pushpin icon on the top-left of the pane.
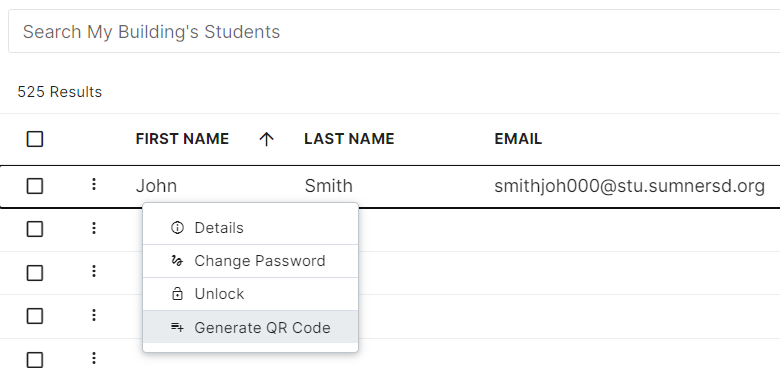
#### Generating QR Badges
---
You can generate QR codes in bulk by selecting multiple results. This will format the page in a way that makes it easier to cut out the badges.
**1**. Right click on a student result and click the **Generate QR Code** option from the context menu
| [](https://wiki.sumnersd.org/uploads/images/gallery/2023-09/u4blNXcpkDdL9KzB-image.png)
|
**2**. Select the **QR Login** option, then click the **View** button
| [](https://wiki.sumnersd.org/uploads/images/gallery/2024-02/1DLHdyrZhwcUWwof-image.png)
|
**3**. RapidIdentity will open a new page with the generated QR code. From here you can adjust the layout of the QR badge (*if needed*) and print it.
| [](https://wiki.sumnersd.org/uploads/images/gallery/2023-08/8IpcKxndw6WqiCqS-image.png)
|
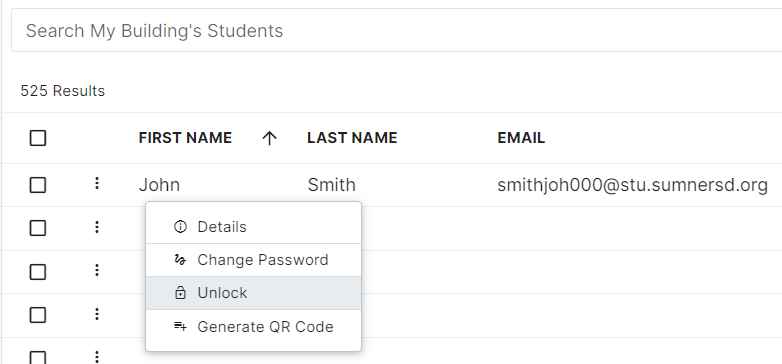
#### Unlocking Accounts
---
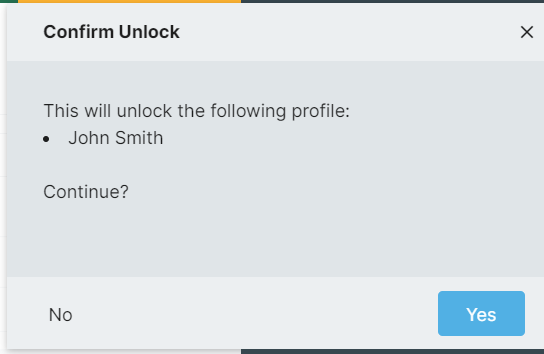
**1**. Right click on a student result and click the **Unlock** option from the context menu
| [](https://wiki.sumnersd.org/uploads/images/gallery/2023-09/zXA4JwBxkkWg0ogJ-image.png)
|
**2**. When prompted, click the **Yes** button
| [](https://wiki.sumnersd.org/uploads/images/gallery/2023-09/QOaXlRQWZupVA7dF-image.png)
|
#### Changing Passwords
---
If you are changing the password for a student who logs in to RapidIdentity with a QR badge, they will require a new QR code to be generated after their password is changed
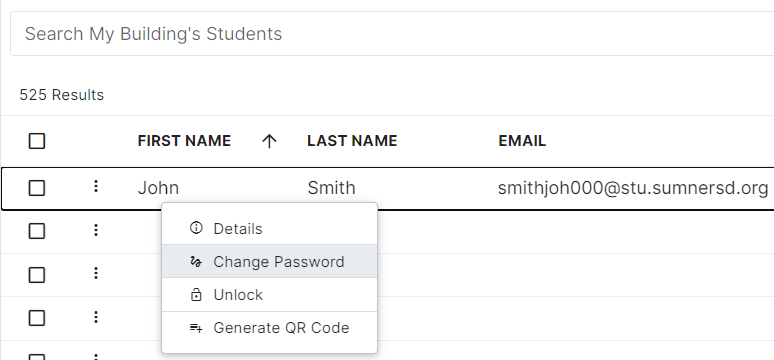
**1**. Right click on a student result and click the **Change Password** option from the context menu
| [](https://wiki.sumnersd.org/uploads/images/gallery/2023-09/Lt2shRXcuTIfL5uf-image.png)
|
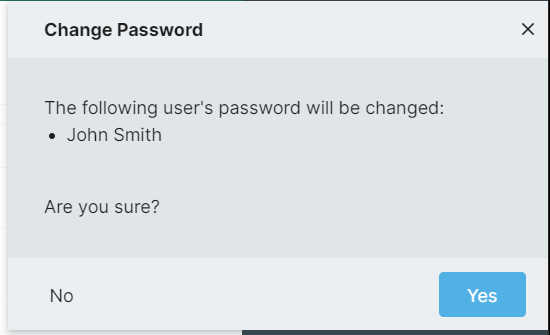
**2**. Click the **Yes** button
| [](https://wiki.sumnersd.org/uploads/images/gallery/2023-09/2HVYy3U2ksLE13vg-image.png)
|
**3**. Enter a new password that complies with the minimum requirements for the account's password policy. If the account belongs to a secondary student (*6-12*), we recommend selecting the **User Must Change Password At Next Login** option so that the student may set their own password after re-gaining access to their account.
| [](https://wiki.sumnersd.org/uploads/images/gallery/2023-09/D5zFdh2eyHRsHyE5-image.png)
|
**4**. Click the **Save** button
It may take several seconds for the password change to complete depending on the current system load
# How To Manage Building Access Control
**These instructions have been migrated to the Technology Services department's new documentation platform. Please [refer to this link](https://sumnersd.getoutline.com/s/abe5eea0-fa4e-4a5b-b1fc-6a1f946373aa/doc/how-to-manage-building-access-control-dAWwKmgP9e) for up-to-date instructions and information regarding this process. The content on this page is no longer maintained and will be removed in the near future.**
#### Requirements
---
1. The `Portal Role Manager` role
2. Be a membership manager of the door access control roles
#### Accessing The Door Roles
---
**1**. Log in to RapidIdentity
**2**. Navigate to the Roles module
| [](https://wiki.sumnersd.org/uploads/images/gallery/2023-09/Vj5CCwqV3W5EuKn9-image.png)
|
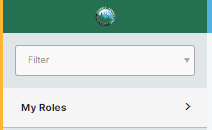
**3**. If it's not already selected by default, select the **My Roles** view
| [](https://wiki.sumnersd.org/uploads/images/gallery/2023-09/Ligoaf7wcP3AJcuK-image.png)
|
**4**. You should now be presented with the building access control roles
| [](https://wiki.sumnersd.org/uploads/images/gallery/2023-09/Rivbpj1nra82iujx-image.png)
|
#### Viewing Members Of An Access Control Group
---
**1**. Right click on a role and select the **Details** option from the context menu
| [](https://wiki.sumnersd.org/uploads/images/gallery/2023-09/fwlGBxCZHJ04sTYq-image.png)
|
**2**. In the Role Details pane, select the **Details** tab. Click the **Members** button in the bottom-right corner.
| [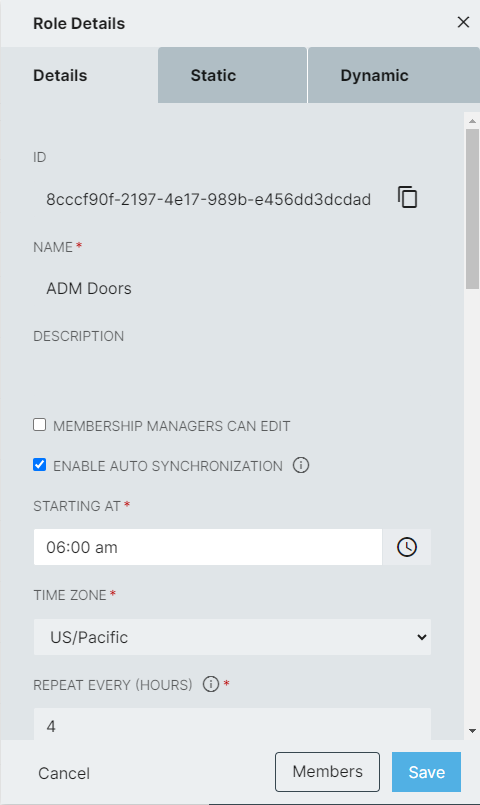](https://wiki.sumnersd.org/uploads/images/gallery/2023-09/lSerRaHEgFfUdepd-image.png)
|
####
#### Adding Users To Access Control Groups
---
**1**. Right click on a role and select the **Details** option from the context menu
| [](https://wiki.sumnersd.org/uploads/images/gallery/2023-09/fwlGBxCZHJ04sTYq-image.png)
|
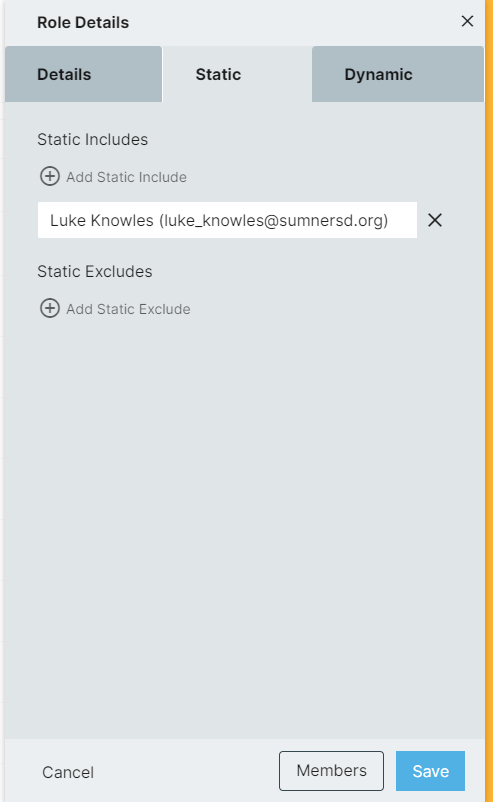
**2**. In the Role Details pane, select the **Static** tab
| [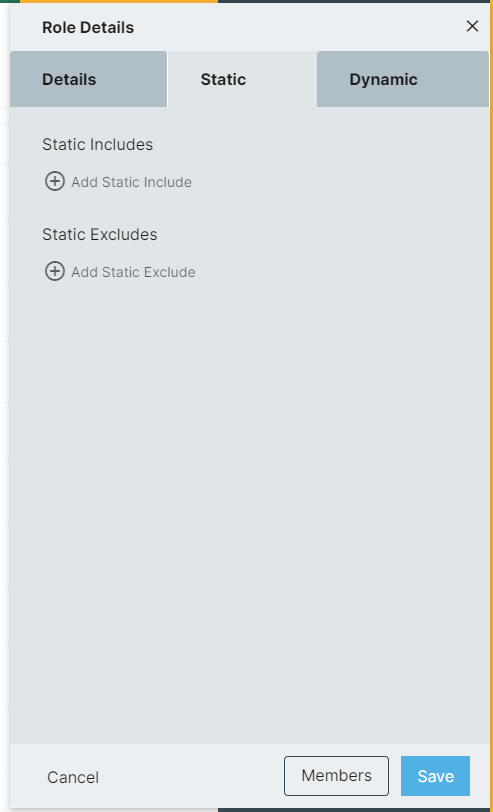](https://wiki.sumnersd.org/uploads/images/gallery/2023-09/8CwK4Eb0mLnkJhXZ-image.png)
|
**3**. Click **Add Static Include**, then search for a user to add to the role. You can search by name or email. Once you have located the person you want to add to the rule, click on their result.
| [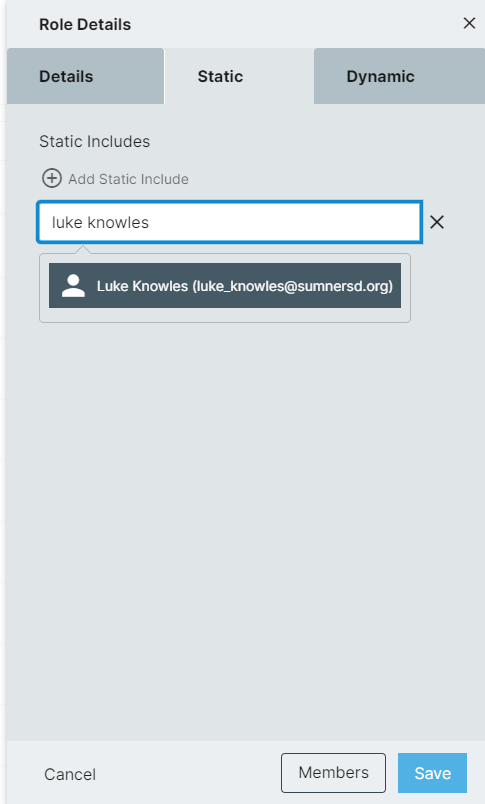](https://wiki.sumnersd.org/uploads/images/gallery/2023-09/0IeURiEx9tjV6izH-image.png)
|
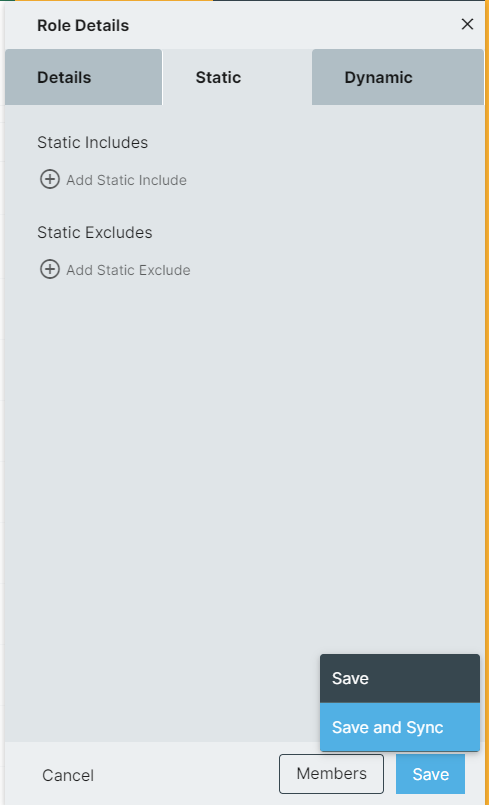
**4**. After you've added the user to the static includes list, click the **Save** button in the bottom-right of the Role Details pane, then select **Save and Sync**
| [](https://wiki.sumnersd.org/uploads/images/gallery/2023-09/MgbJEFSiZhjdcNra-image.png)
|
**5**. Click **Yes** when prompted with a warning notification
| [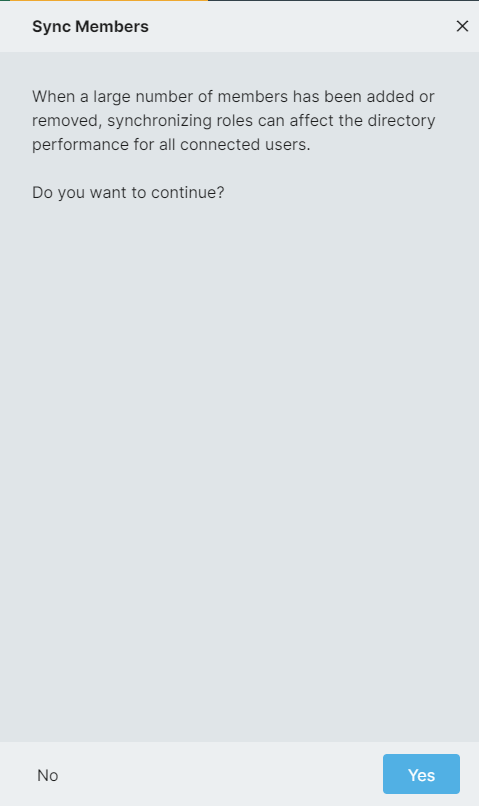](https://wiki.sumnersd.org/uploads/images/gallery/2023-09/kquLO7pjJrRDCh1K-image.png)
|
#### Removing Users Who Were Manually Added To Access Control Groups
---
**1**. Right click on a role and select the **Details** option from the context menu
| [](https://wiki.sumnersd.org/uploads/images/gallery/2023-09/fwlGBxCZHJ04sTYq-image.png)
|
**2**. In the Role Details pane, select the **Static** tab
| [](https://wiki.sumnersd.org/uploads/images/gallery/2023-09/xAYvY4R20rGkfe7a-image.png)
|
**3**. Click the **X** next to the person you want to remove from the group
| [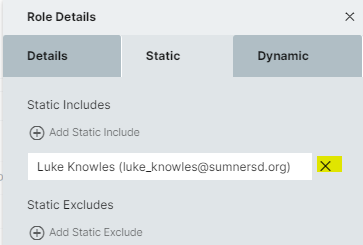](https://wiki.sumnersd.org/uploads/images/gallery/2023-09/2GSJPZTozBNXYiIJ-image.png)
|
**4**. Click the **Save** button in the bottom-right of the Role Details pane, then select **Save and Sync**
| [](https://wiki.sumnersd.org/uploads/images/gallery/2023-09/6YLoRvY6kNrX5NPi-image.png)
|
**5**. Click **Yes** when prompted with a warning notification
| [](https://wiki.sumnersd.org/uploads/images/gallery/2023-09/kquLO7pjJrRDCh1K-image.png)
|
####
#### Removing Users Who Were Automatically Added To Access Control Groups
---
**1**. Right click on a role and select the **Details** option from the context menu
| [](https://wiki.sumnersd.org/uploads/images/gallery/2023-09/fwlGBxCZHJ04sTYq-image.png)
|
**2**. In the Role Details pane, select the **Static** tab
| [](https://wiki.sumnersd.org/uploads/images/gallery/2023-09/8pMRMj3dzsjbUPkc-image.png)
|
**3**. Click **Add Static Exclude**, then search for a user to exclude from the role. You can search by name or email. Once you have located the person you want to exclude, click on their result.
| [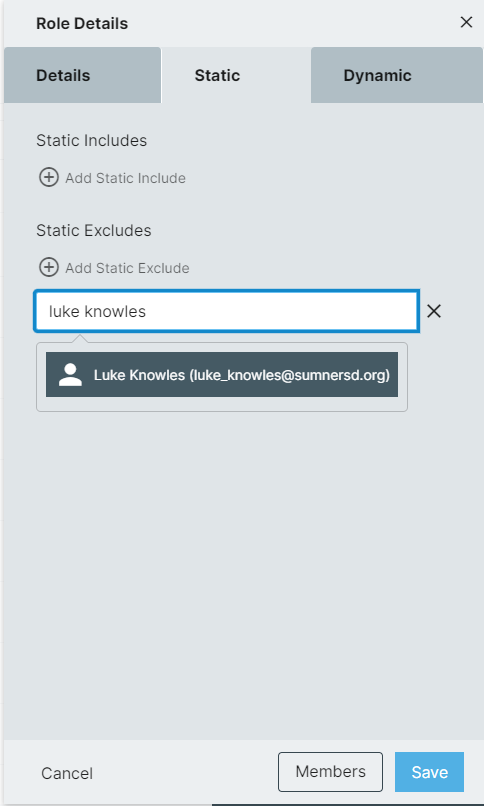](https://wiki.sumnersd.org/uploads/images/gallery/2023-09/zcgj6irGnzw8qQE3-image.png)
|
**4**. After you've added the user to the static excludes list, click the **Save** button in the bottom-right of the Role Details pane, then select **Save and Sync**
| [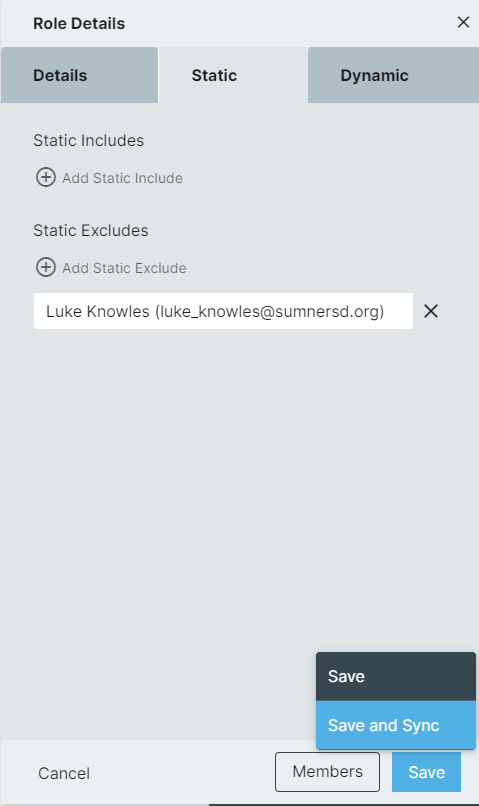](https://wiki.sumnersd.org/uploads/images/gallery/2023-09/dcu10kQ96kddwwsn-image.png)
|
**5**. Click **Yes** when prompted with a warning notification
| [](https://wiki.sumnersd.org/uploads/images/gallery/2023-09/kquLO7pjJrRDCh1K-image.png)
|
# New RapidIdentity Dashboard 2024
[](https://wiki.sumnersd.org/uploads/images/gallery/2024-08/OlZoFRLfRbc2IKl8-unnamed-1.png)
## **Settings**
| **[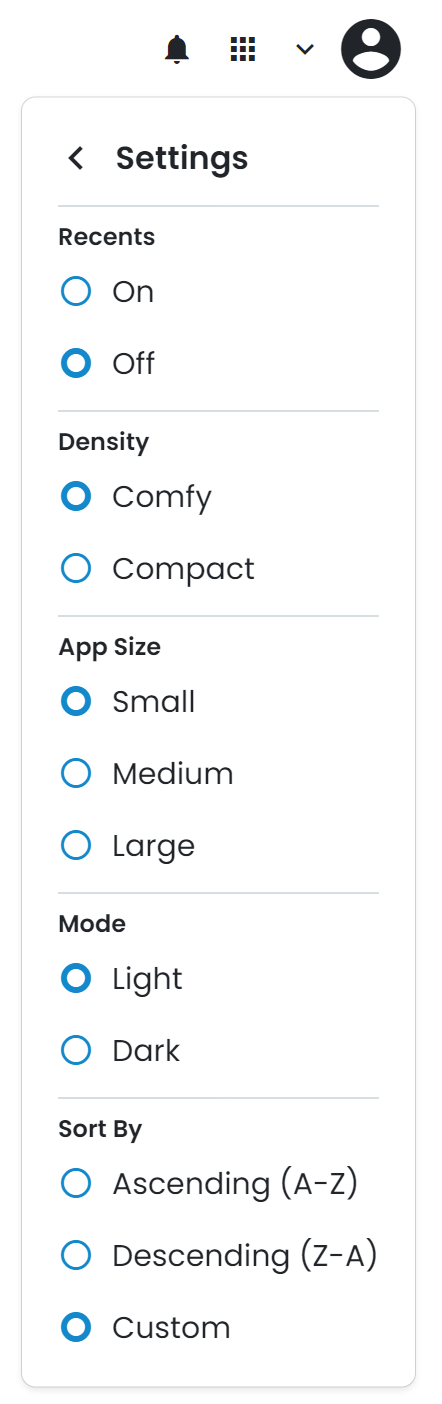](https://wiki.sumnersd.org/uploads/images/gallery/2024-08/Z7LTrqJvf6Krc9HC-image.png)**
| | **Setting**
| **Description** | | **Recents**
| Toggles showing your recently opened apps at the top of the page | | **Density**
| Adjusts the spacing between folder and app icons
| | **App Size**
| Adjusts the size of folder and app icons | | **Mode**
| Switches between a light and dark theme | | **Sort By**
| Adjusts the order which folders and apps are sorted by |
|
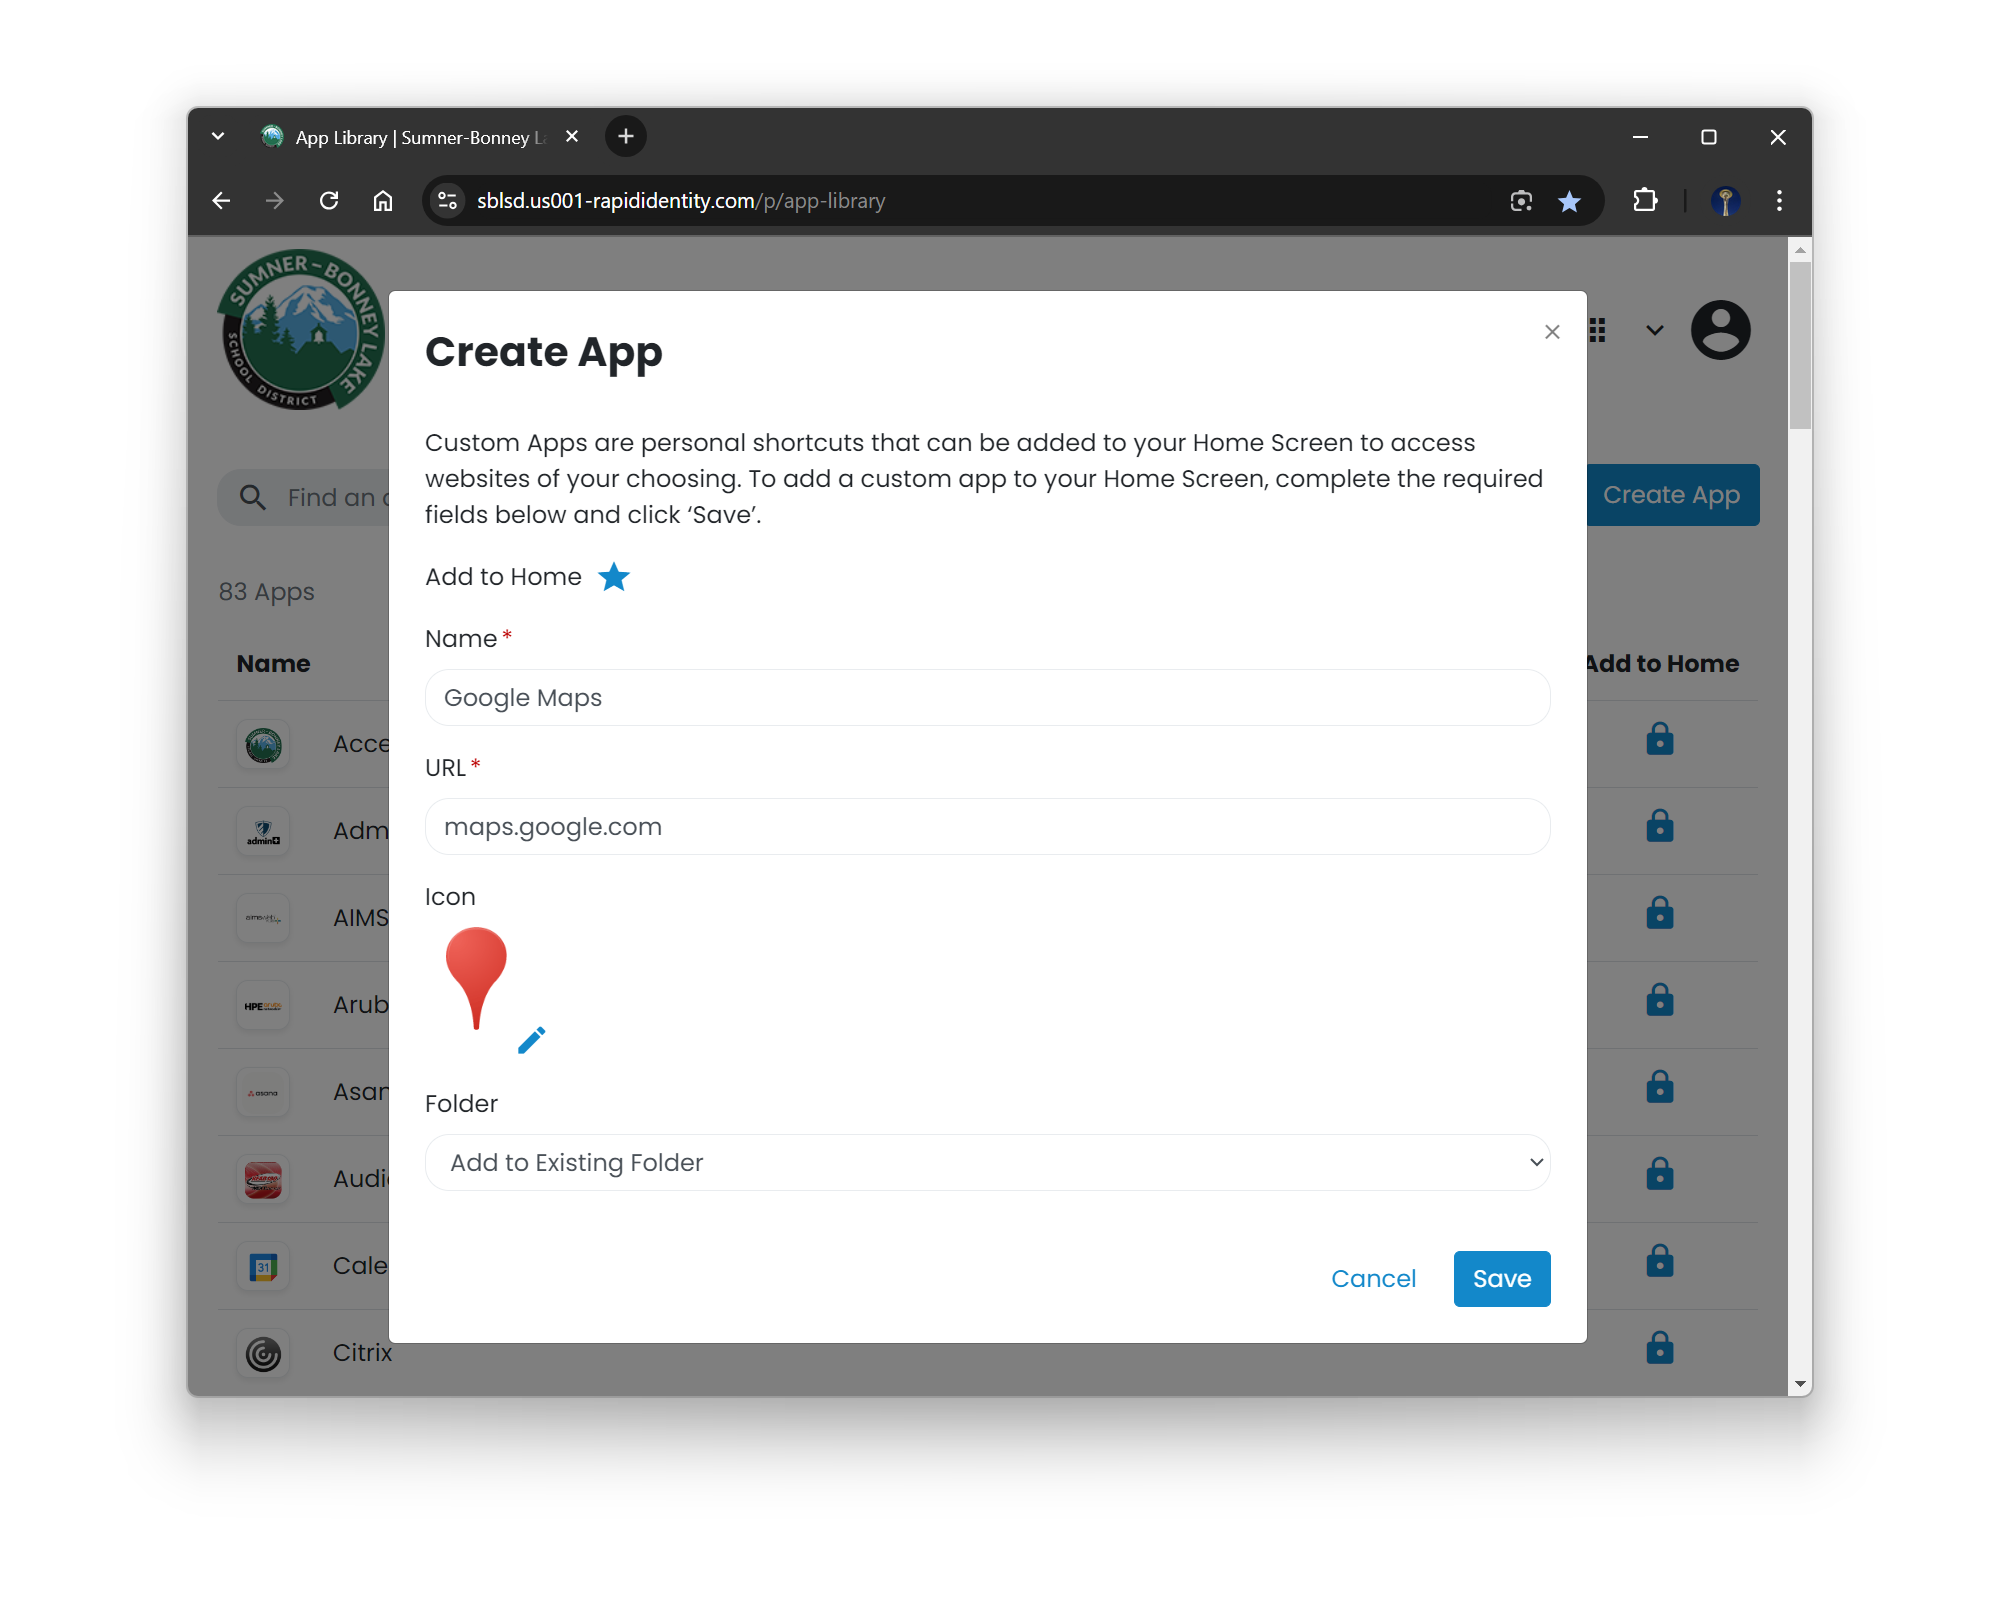
## **Custom Apps**
[](https://wiki.sumnersd.org/uploads/images/gallery/2024-08/blapwn4LL2MerrrR-image.png)
## **Switching Between the New & Old Dashboards**
| Switch to the **old** dashboard
| Switch to the **new** dashboard |
| [](https://wiki.sumnersd.org/uploads/images/gallery/2024-08/V1iarXot9T6rDHze-image.png)
| [](https://wiki.sumnersd.org/uploads/images/gallery/2024-08/Hclt7FoITSYUUWMX-image.png)
|
## **Get Early Access to The New Dashboard**
1. Open the [RapidIdentity Requests](https://sblsd.us001-rapididentity.com/ui/requests) module
2. Select **Entitlements** > **Catalog** from the menu on the left
3. Locate the **New RapidIdentity Dashboard** entitlement, then click the **Request** button which will open a popup
4. Click the **Request** button in the popup
[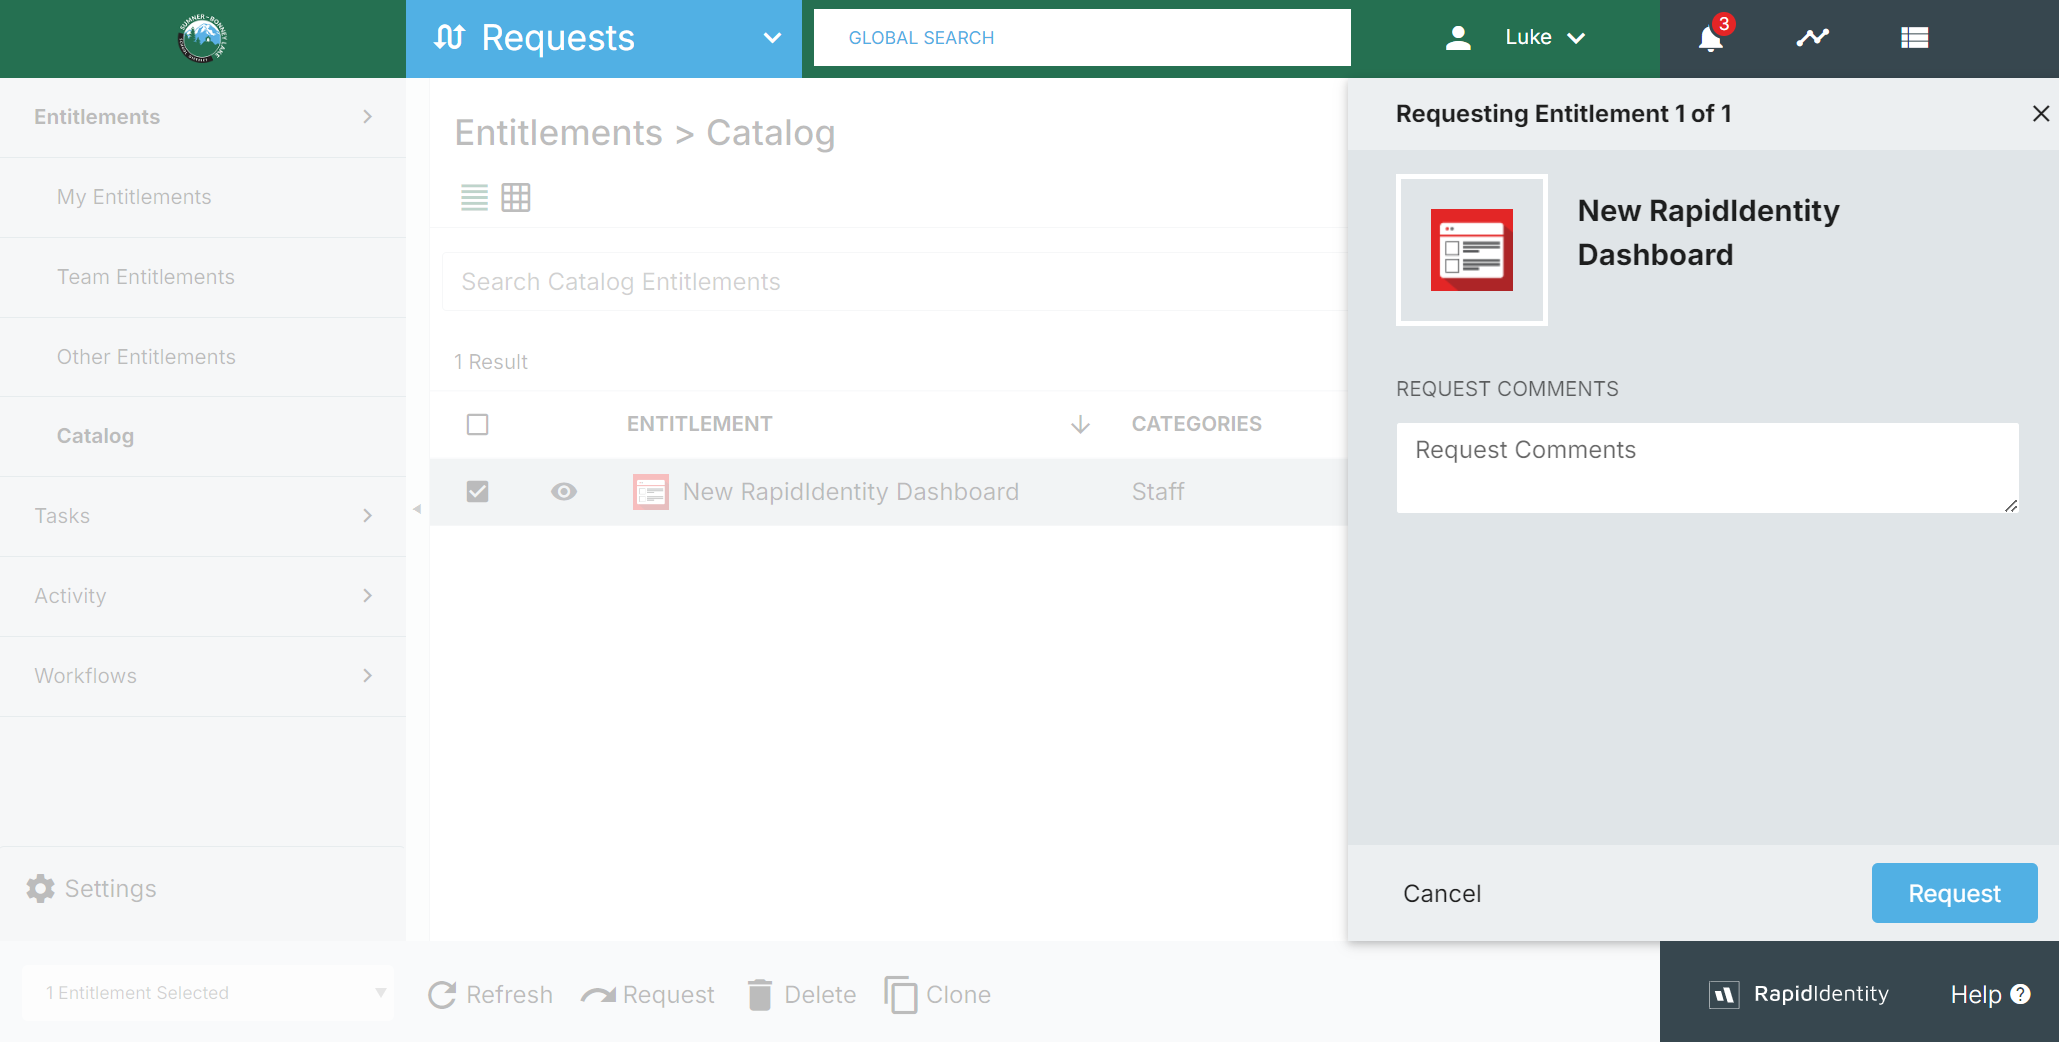](https://wiki.sumnersd.org/uploads/images/gallery/2024-08/KdSDlbkojBW8DxvR-image.png)
5. Wait a few moments for the request to automatically be fulfilled, then navigate to [sblsd.us001-rapididentity.com](https://sblsd.us001-rapididentity.com/).
# Wiki
# Wiki Standards & Style Guide
### BookStack User Docs
[https://www.bookstackapp.com/docs/user/content-overview/](https://www.bookstackapp.com/docs/user/content-overview/)
### Basic Do's and Dont's
| **Do** | **Don't** |
| Embed links to other wiki pages that exist as supplemental instructions/information which are relevant to your guide, but not specific to it | Reiterate instructions or reference material which exists as their own wiki page |
| Paste text **without** the source formatting (`CTRL` *+* `Shift` *+* `V`), then apply formatting within the wiki's page editor | Paste text with source formatting (`CTRL` *+* `V`). Fonts, text color, and background colors vary depending on each system's and user's personal settings |
| Use AP title case for page titles and headers | Use inconsistent or incorrect capitalization in page titles and headers |
| Call attention to UI elements by either bolding them, or using an inline image of the UI element when writing instructions. For example:
1. *Click the **Save** button*
or
1. *Click the [](https://wiki.sumnersd.org/uploads/images/gallery/2022-09/image-1662652350057.png) button*
| Use screenshots of an entire page in order to visualize or label UI elements for step by step instructions, unless there is a good reason to. |
### Technical Writing Resources
| Provider | Link(s) |
| Google | - [https://developers.google.com/style](https://developers.google.com/style)
|
| Microsoft | - [https://learn.microsoft.com/en-us/style-guide/welcome/](https://learn.microsoft.com/en-us/style-guide/welcome/)
|
| Apple | - [https://support.apple.com/guide/applestyleguide/welcome/web](https://support.apple.com/guide/applestyleguide/welcome/web)
|
### Recommended Tools
| Provider | Link(s) | Notes |
| ScreenToGif | - [https://www.screentogif.com/](https://www.screentogif.com/)
| Useful for making quick GIFs to demonstrate navigating UIs |
# Zoom
# How to Login to Zoom
### From the Web
---
**1**. Log in to [RapidIdentity](https://sblsd.us001-rapididentity.com/)
**2**. Click the Zoom application on the Dashboard
| [](https://wiki.sumnersd.org/uploads/images/gallery/2023-10/m9lgcwZOfIWwRAau-image.png)
|
If you don't see Zoom bookmarked on your RapidIdentity dashboard, open the Applications module and select it from the list of available apps
**3**. Click the **Sign In** button
| [](https://wiki.sumnersd.org/uploads/images/gallery/2023-10/5bwHgKg7gqU6AGzF-image.png)
|
### From the Zoom App
---
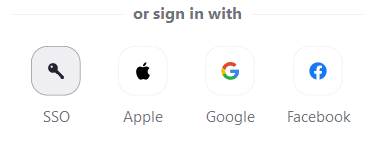
**1**. Open the Zoom application
**2**. Click the **Sign In** button
**3**. Click the **SSO** button under the *"or sign in with"* section
| [](https://wiki.sumnersd.org/uploads/images/gallery/2023-01/VcVzEUxtuSa6gghZ-image.png)
|
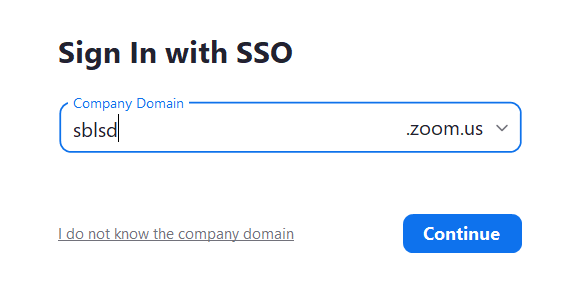
**4**. Enter `sblsd` in the **Company Domain** field
| [](https://wiki.sumnersd.org/uploads/images/gallery/2023-01/4p8sjnONk0OADmhO-image.png)
|
**5**. Click the **Continue** button
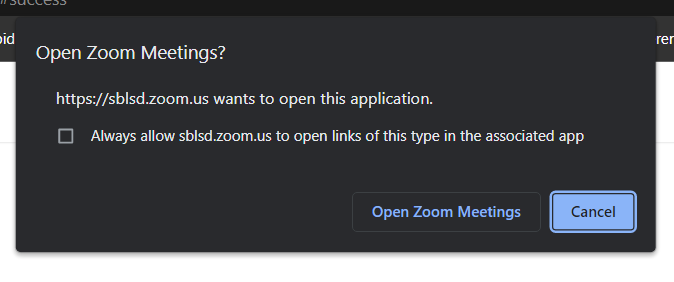
**6**. Your browser will launch in order to authenticate using SSO. If you are not already logged in to RapidIdentity, you will be prompted to log in.
**7**. When prompted by your browser, click the **Open Zoom Meetings** button
| [](https://wiki.sumnersd.org/uploads/images/gallery/2023-01/mmiMV571kUuaT3PE-image.png)
|
# How to Allow External Participants in Zoom Meetings
### Overview
---
Staff members may disable the setting which restricts their Zoom meeting such that any participants must be logged in to Zoom in order to join. The SBLSD Technology Services department recommends keeping this setting enabled in most situations for security purposes, however there are valid use cases where temporarily disabling this restriction may be necessary, such as when hosting remote parent-teacher conferences.
Steps 1-4 covers the process of adjusting the Zoom account-level setting which requires participants of your meetings to have a Zoom account when joining your meeting via the web.
Steps 5-6 addresses changing the meeting-level setting which requires the participants to use a SBLSD Zoom account.
Changing both settings is necessary to allow external users to join your Zoom meeting without a Zoom account.
### Steps
---
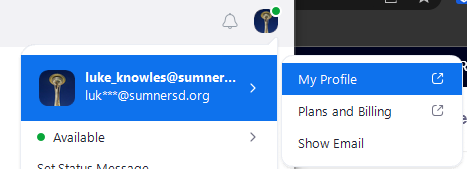
**1**. [Log in to your SBLSD Zoom account](https://wiki.sumnersd.org/link/251#bkmrk-from-the-web) on the web
*If you're already logged in to the Zoom app, you can launch the web interface by clicking on your profile picture in the top-right corner and selecting **My Profile***
| [](https://wiki.sumnersd.org/uploads/images/gallery/2023-10/vN2Wvcdf8iEfRAco-image.png)
|
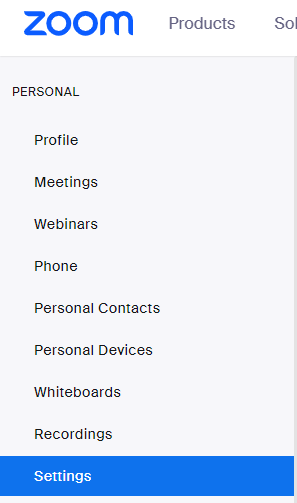
**2**. Navigate to **Personal** > **Settings**
| [](https://wiki.sumnersd.org/uploads/images/gallery/2023-10/zSghKV6ouTW8Silw-image.png)
|
**3**. Select the **Meeting** tab
**4**. In the Security section, toggle the **Only authenticated users can join meetings from Web client** setting as needed
| [](https://wiki.sumnersd.org/uploads/images/gallery/2023-10/FuzMzbfnyfauF3xT-image.png)
|
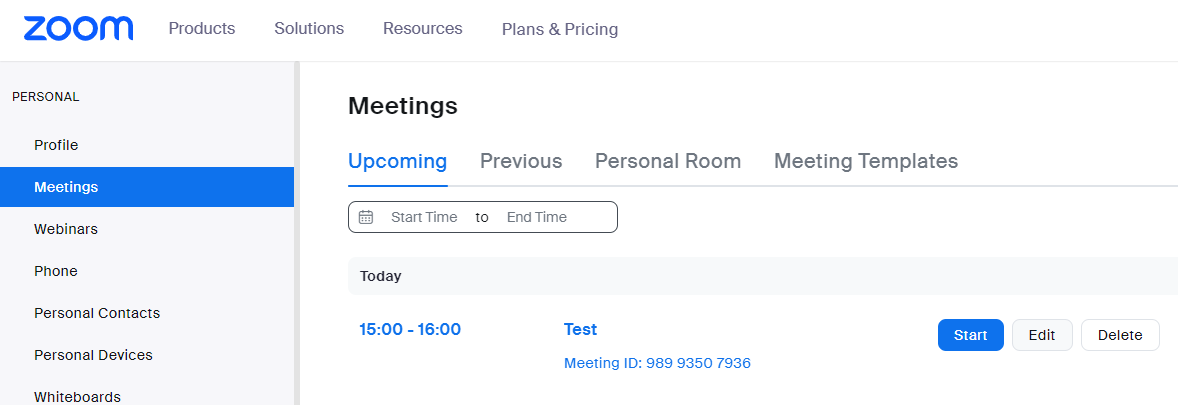
**5**. Navigate to **Personal** > **Meetings**, then click the **Edit** button on your meeting
| [](https://wiki.sumnersd.org/uploads/images/gallery/2023-10/aSZey6pcZ23O7p9Z-image.png)
|
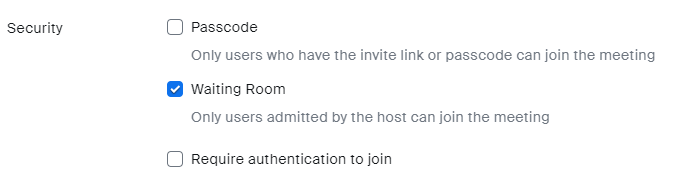
**6**. Scroll down to the **Security** section and disable the **Require authentication** to join option
| [](https://wiki.sumnersd.org/uploads/images/gallery/2023-10/BwbqQcenSFaMO4zQ-image.png)
|
# Intercoms
There are two different types of intercom systems throughout the district. These documents will help you perform the necessary tasks to fix the most common problems with each system.
# Telecor XL (BLE, BHS, DEE, CWE, LRE, DVE, MLE, SMS, MMS)
#### Below are the procedures for the most common tasks, these are performed from the Telecor console phone in the main office, model number is normally MC-300 and looks similar to a standard district phone but with no LCD display.
**Turning programming on and off:** ( *most actions require programming on for them to work* )
1. Press “Program Function”
2. Press 6 1 1 1 1 \* - you should see a prompt saying programming enabled.
3. Press “Cancel” to bring the screen to the home screen.
*To disable programming mode repeat steps 1-3 above, programming off should be displayed if successful.*
**Changing the time:** (*Must be in programming mode*):
1. Press TIME FUNCTION.
2\. Enter the time in the format DHHMM, where: D=Day of Week (Sun=0, Mon=1, Tues=2 etc.)HH = Hour in 24-Hour Format (9 a.m.= 09, 1 p.m.= 13, etc.)MM = Minutes (00 to 59)
3\. Press \*. (When you press the star button the time begins the minute you input at 0 seconds and counts up. I recommend having a clock open with seconds showing and attempting to time the star button press as close to the 0 second as possible.)
4\. Turn programming mode off as outlined above.
**Enable and disable bell schedule:** (*Must be in programming mode*)
1. Press “Time Function”
2. Press ( 5, 1, \* ) - to activate schedule number 1 OR - ( 5, 0, \* ) to deactivate schedule 1.
*Multiple different schedules can be set for different schedules, some use 1 for Monday and 2 for Tuesday-Fri. However you can set all the bells for all the days within one schedule this will be explained next.*
**Modifying Bell Schedule:** (*Must be in programming mode*)
1. Press “Time Function”
2. Press ( 4, 1, \* ) to begin modifying schedule 1
3. You will see ( - Programming E 1 - )displayed indicating event 1.
4. Press \* to bring you to the next screen which controls the days the bell will ring. 0 - Sunday, 1-Monday, 2-Tuesday, 3-Wednesday etc. Press the number for each day you want this bell to ring. 2,3,4,5 will ring Tues-Fri.
# Informacast ( THE, ELC, EHE, SHS )
*The Informacast system is managed through a web portal found at ip (10.1.1.118) from your browser. Single sign on is not configured for this application so you will need to speak with the Systems Engineer for access if it has not been granted previously.*
**Adjusting the volume on a clock:**
1. Login to to the web interface, and click on hardware in the left-hand column.
2. Click "Speakers and InformaCast Desktop Notifiers" this will list all of the speakers controlled by the InformaCast system.
3. Find the speaker you wish to modify which are labeled by school and room number (EHE Classroom 103). To the right of this click on the kebab icon( 3 stacked dots) to bring up the options for that individual clock and click increase or decrease volume as needed.
**Changing the Bell Schedule.:**
1. From the home screen in the left hand column, click on "Bells" and then click on "Ring Lists"
2. Here you will see a list of all the schedules for each building. Click on the schedule for the building you wish you modify and it will bring you to the list of bells currently scheduled to ring.
3. You will see a list of each bell with three
# ExploreLearning Apps
Gizmos, Reflex, Frax, Science4Us
# How to Assign Product Access to Students
Student accounts are automatically created and rostered in ExploreLearning (*Reflex, Frax, etc.*) by Clever. However, new students are not assigned product access by default and will initially be unable to login to ExploreLearning app(s) until they are given an assignment.
### **Instructions**
---
**1**. Select your class from the ExploreLearning landing page.
| [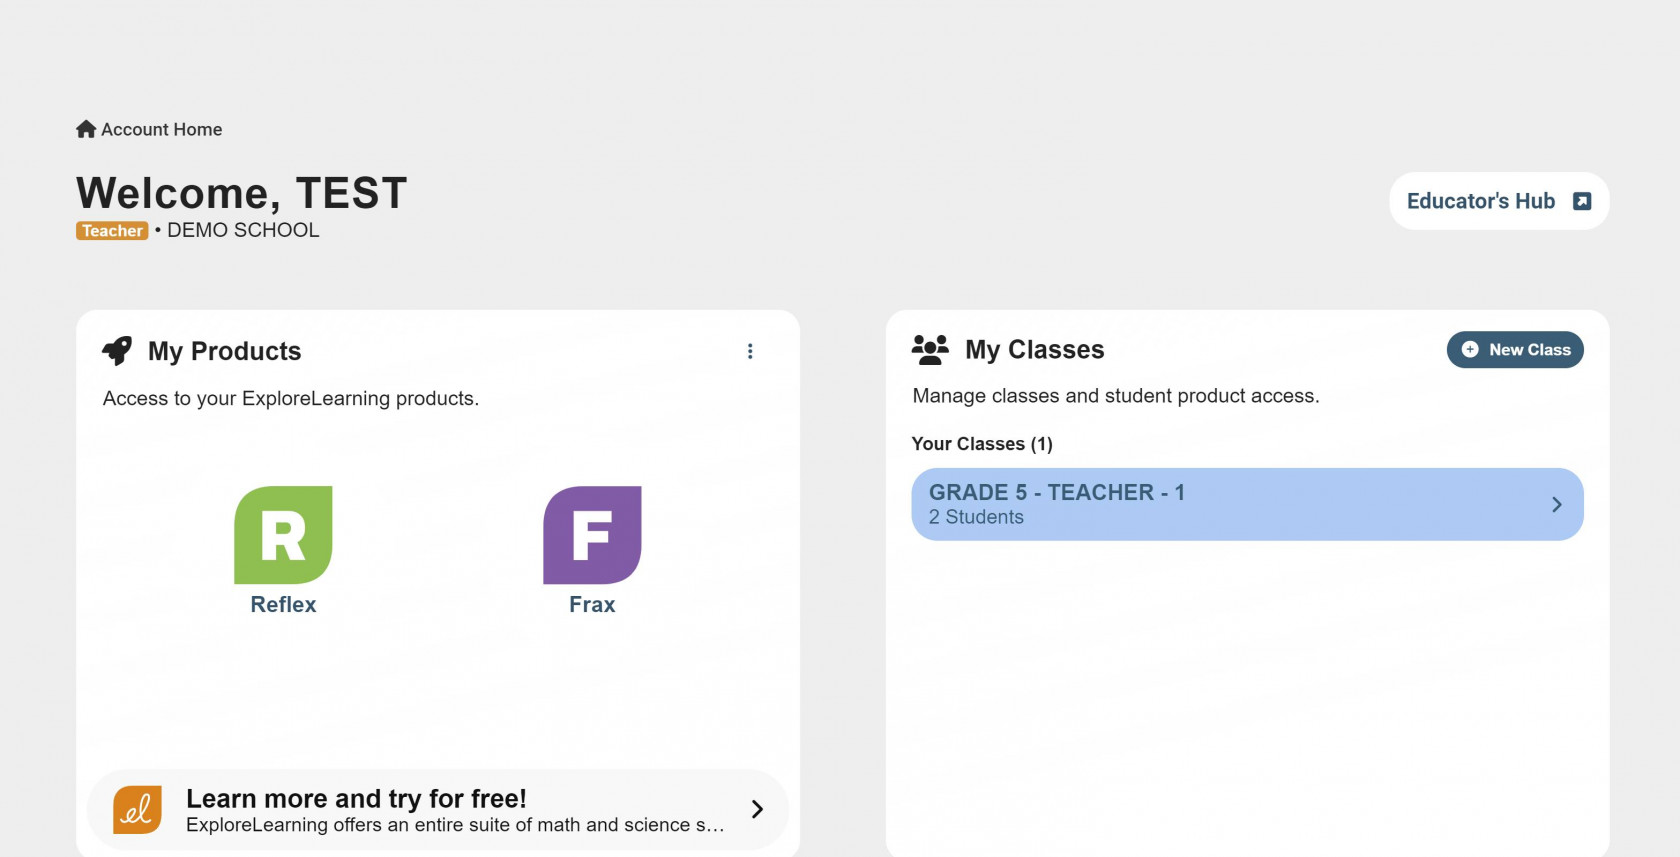](https://wiki.sumnersd.org/uploads/images/gallery/2024-01/nzFETJYCNbJsqsDP-0.jpg) |
**2**. Locate the student(s) in your roster who don't have product access - they are indicated by a red exclamation point next to their name.
| [](https://wiki.sumnersd.org/uploads/images/gallery/2024-01/qNVCLSl5fnq91u3c-1.jpg) |
**3**. Click on the student's name to bring up their profile, then click on either of the greyed out product icons at the top.
| [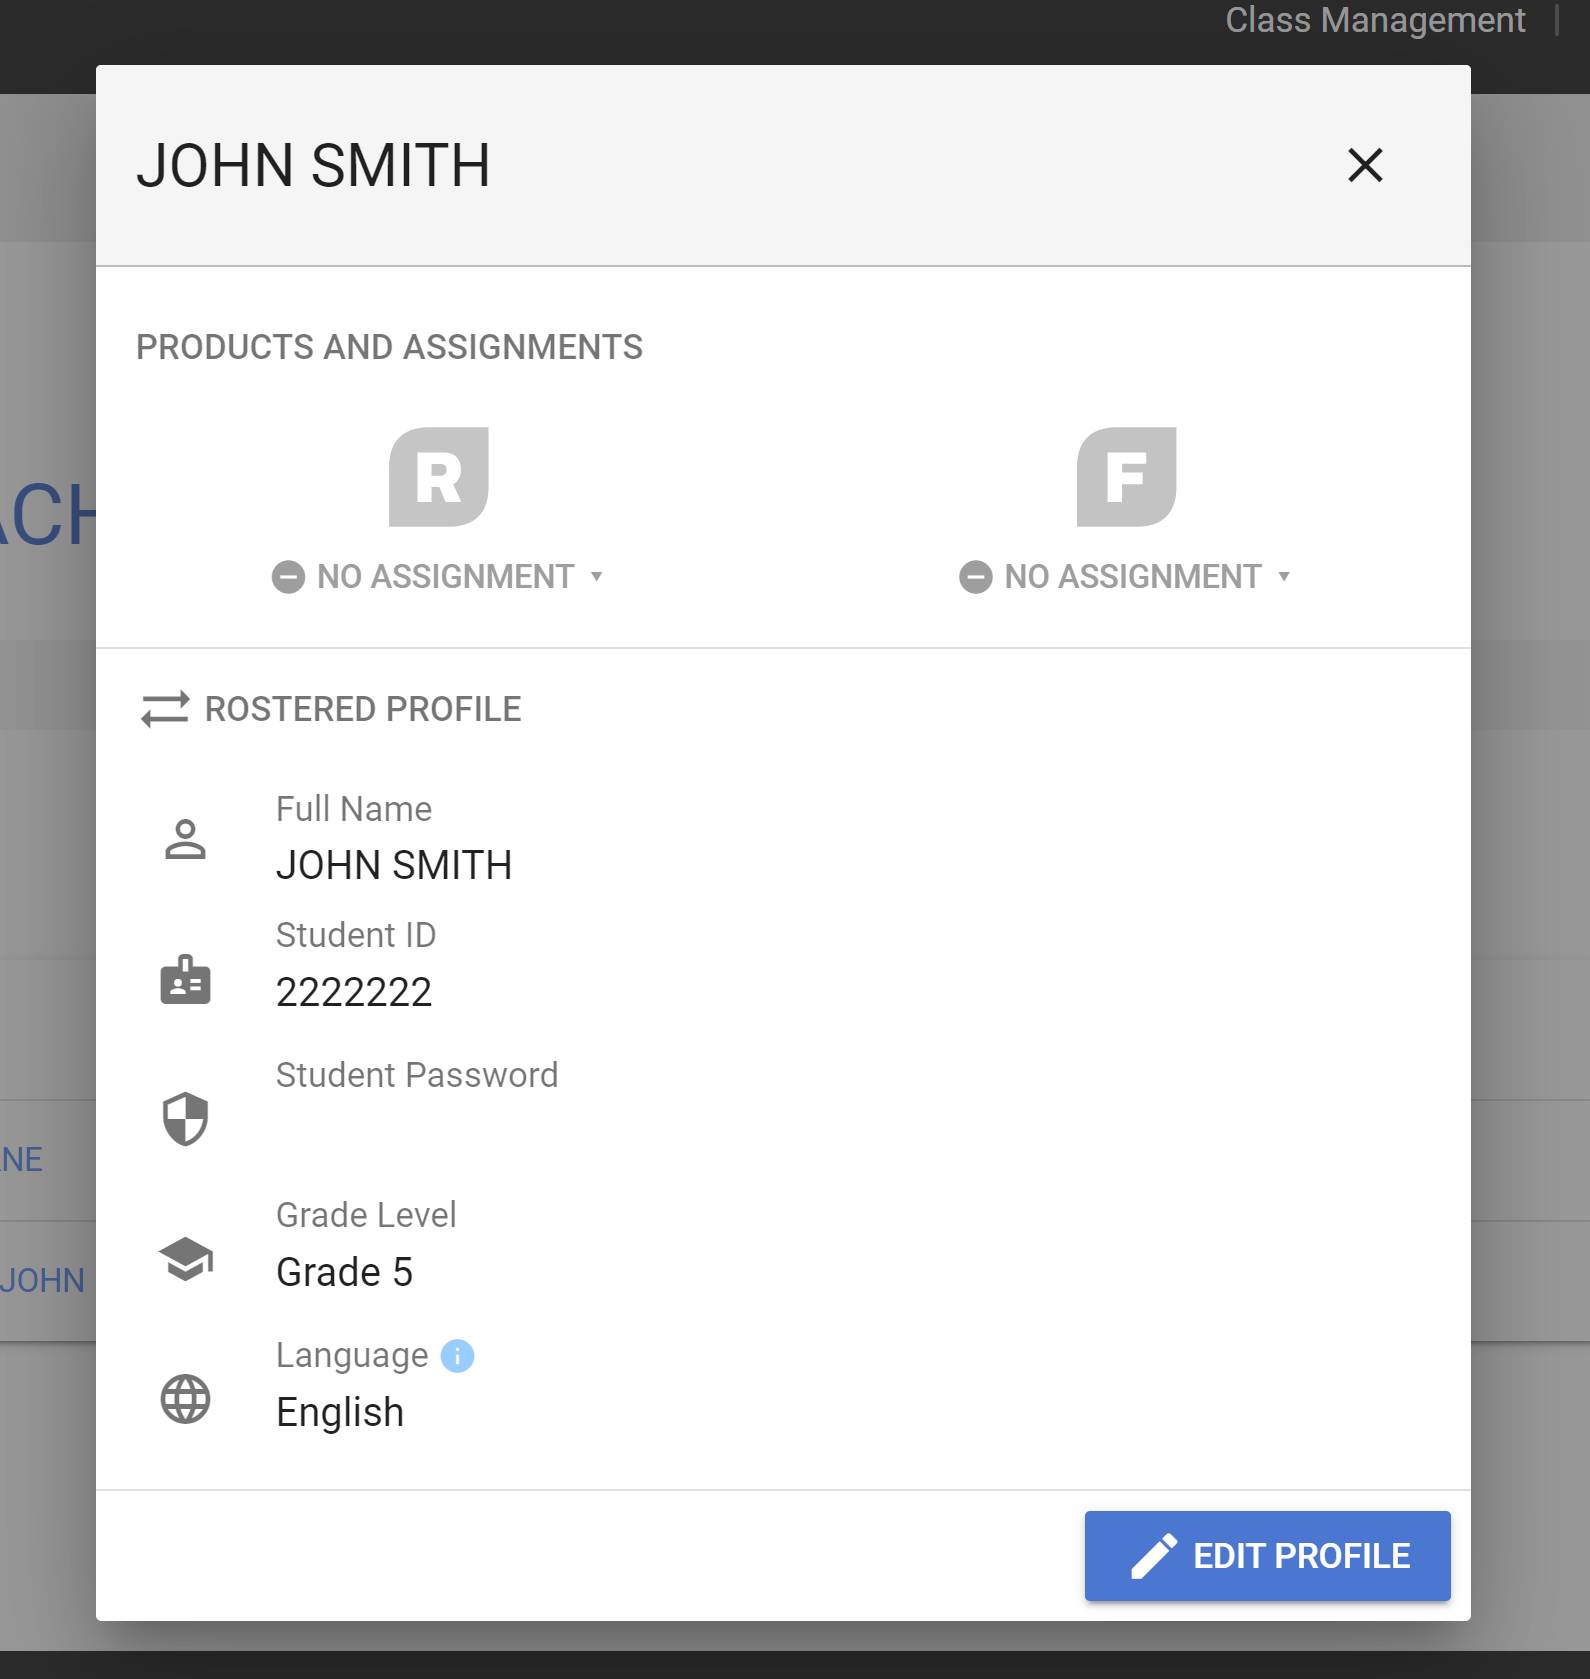](https://wiki.sumnersd.org/uploads/images/gallery/2024-01/yT3MZwfhLovpD5gy-2.jpg) |
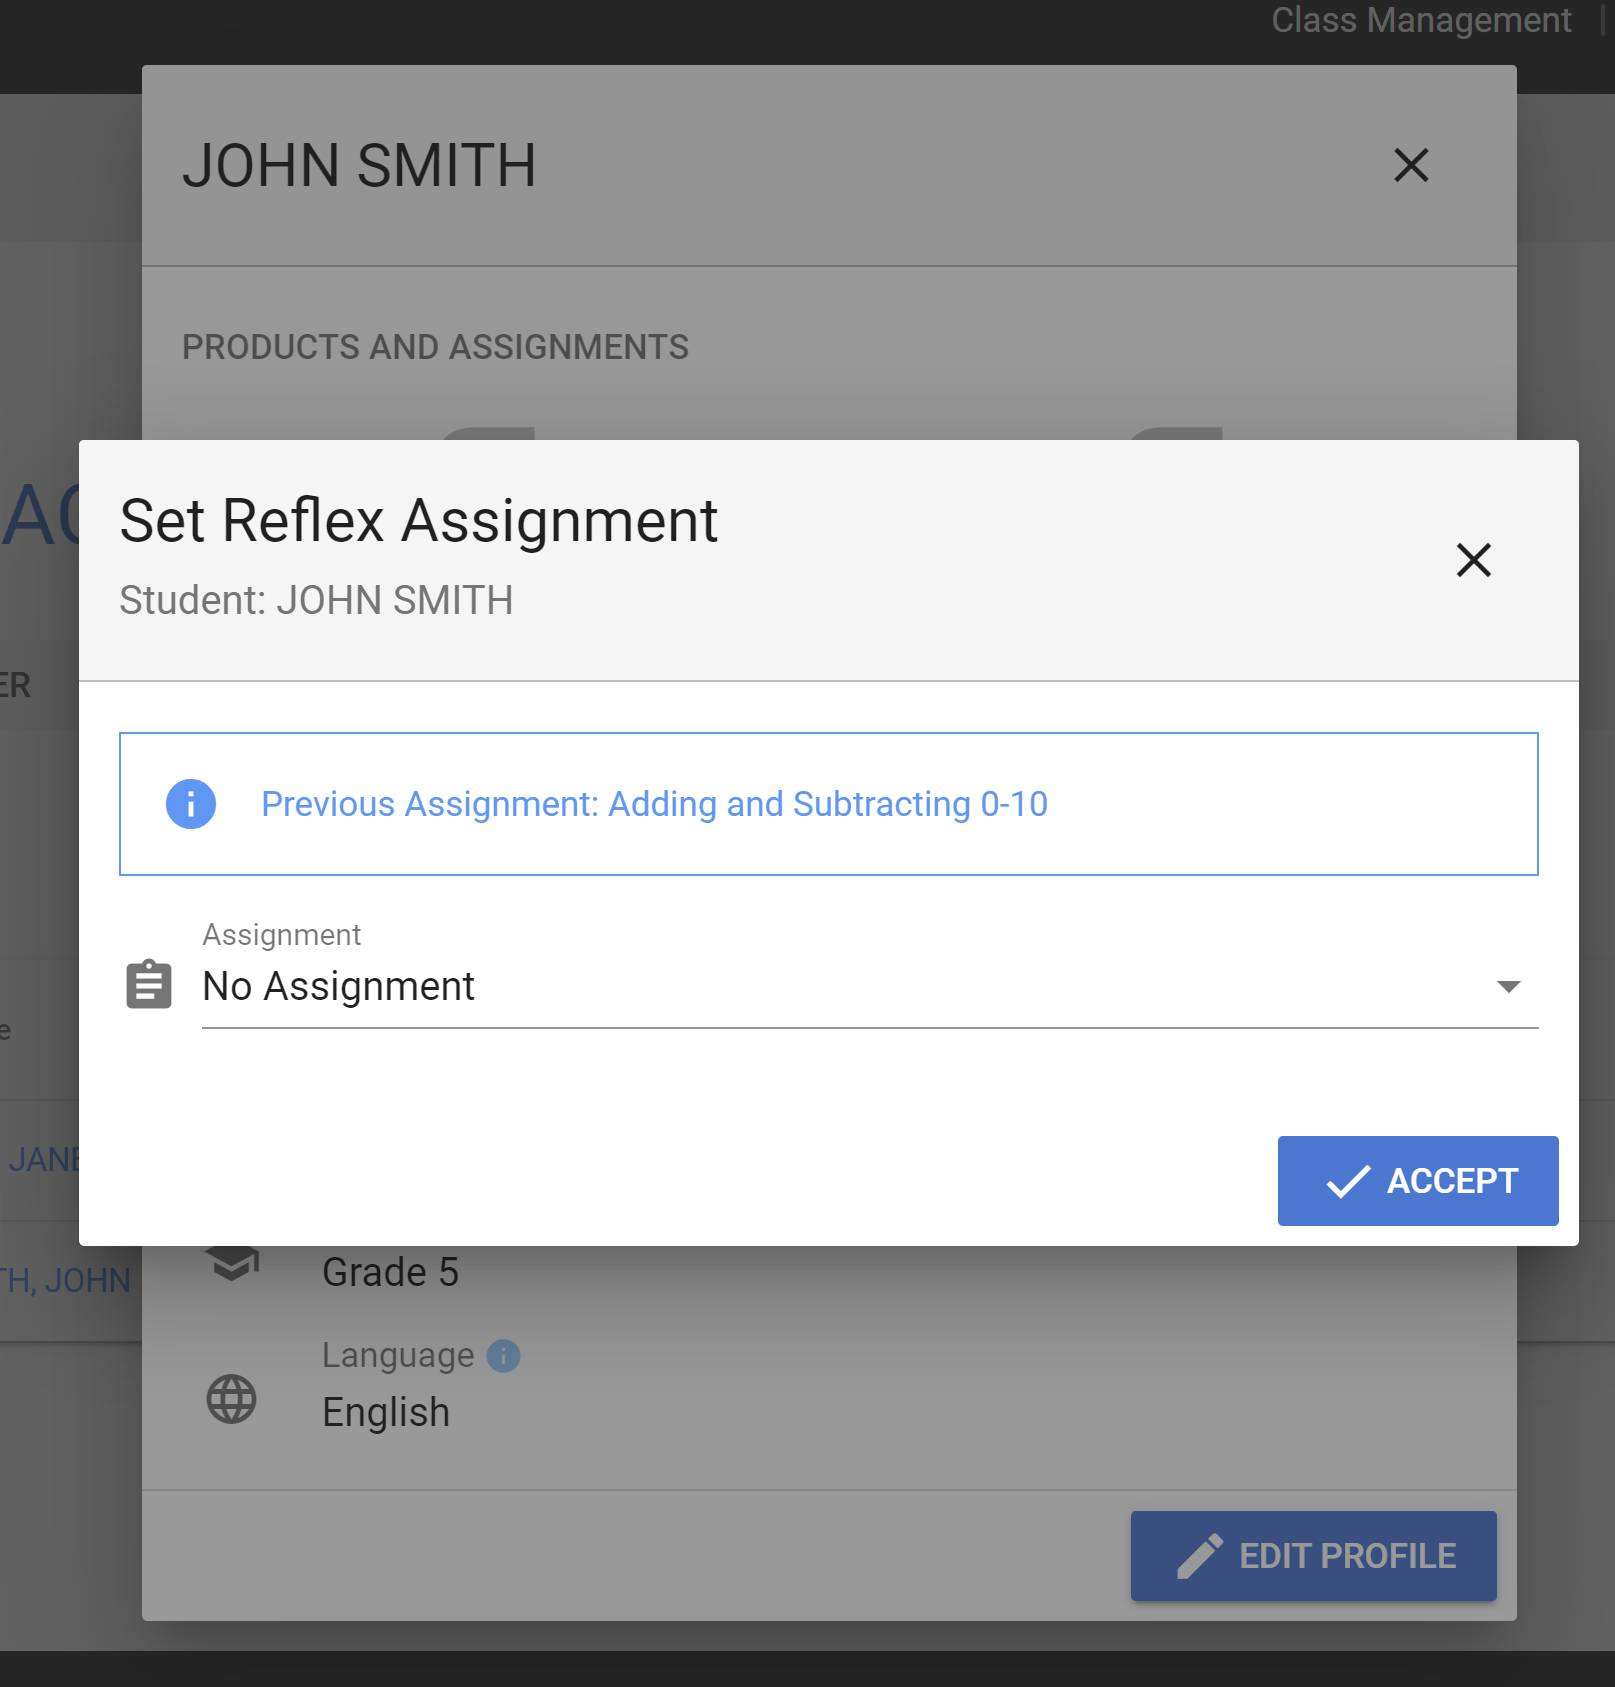
**4**. A new window will appear. Click on the assignment dropdown and select an appropriate option for the student. When you're finished, click the Accept button to save the product assignment for this student.
| [](https://wiki.sumnersd.org/uploads/images/gallery/2024-01/q6uGu0GKRdaOGBr1-3.jpg) |
**5**. Repeat steps 3-4 as necessary for other products which haven't been assigned to the student yet.
### **Reference**
---
- [https://explorelearning.my.site.com/help/s/article/Provide-Change-Student-Product-Assignments](https://explorelearning.my.site.com/help/s/article/Provide-Change-Student-Product-Assignments)
- [https://explorelearning.my.site.com/help/s/article/Enabling-Reflex-Frax-and-Science4Us-for-your-Student](https://explorelearning.my.site.com/help/s/article/Enabling-Reflex-Frax-and-Science4Us-for-your-Student)
- [https://explorelearning.my.site.com/help/s/article/Reflex-Rostering-FAQ](https://explorelearning.my.site.com/help/s/article/Reflex-Rostering-FAQ)
# THE METAVERSE
# Oculus Setup
# Device, Account, and Lab Configurations for Meta Quest 2.
##### **Introduction**
Oculus Meta Quest 2's are being used for high school game design courses, currently (1/29/2024) only offered in Zach York's class at SHS. The goal is for the class to develop games in Unity on the lab computers, and to be able to export the game to the Oculus for play/testing.
Notes: Developer Mode for the Oculus requires a Developer account, which requires an Organization to be created. Developer accounts require MFA (phone) or credit card on file. The CTE credit card was attached to both the CTE account and Zach's account. Purchases can be be set up to require a PIN, which CTE should do before the class starts. The same developer account has to be used on the headset and the app, which reinforced the use of Zach's account rather than student accounts.
Resources: [https://developer.oculus.com/documentation/unity](https://developer.oculus.com/documentation/unity)
##### **Accounts**
- The students will sign in to their lab PC with their accounts as usual.
- The Meta Quests are set up with Zach's Meta Account: zacharia\_york@sumnersd.org
- The Meta Quest Developer Hub (MQDH) is the program on the computer that interfaces with the Oculus, and Zach's account is used there as well.
- There is an overarching CTE Organization account, with Zach's account under it.
- This account is under
, password is ***\[REMOVED\]*** not needed, as a OTTP is sent to the CTE email. The organization name is Sumner-Bonney Lake CTE Department
- Connected Horizon Account: Name - CTE Username - SBLSD.CTE
- The birthday was set as December 25th, 1980.
- We used Zach's tablet's Oculus mobile app to register each Meta device.
Both Zach's and the CTE accounts are not tied to any other of our services (like Rapid Identity, Google, etc.), and are just used for Meta Sign in. Firewall exceptions had to be made during setup to allow downloads, authentications, etc to facebook-related servers, which are normally blocked for students.
The CTE account exists so that Zach's account can have a few restrictions placed on it, like the ability to delete the organization (important). It helps for if this class is ever offered at another building, or if any staffing changes take place. Developer accounts have to have two-factor enabled, which is either to have the CTE credit card or a cell phone on file, which is another reason we did not want to set up individual student developer accounts. The permissions should be periodically reviewed by CTE.
When signing in, select "sign in with email" as opposed to with Facebook/Oculus. Retreive the OTTP.
**Account settings:**
Profile: https://secure.oculus.com/my/profile/
developer account settings: https://developer.oculus.com/manage/
Meta: https://accountscenter.meta.com/
##### **Meta Quest 2 Setup**
The Meta Quest setup itself is straightforward. Add the device's MAC address (it isn't on the box, currently) by connecting to guest, and then selecting the guest connection itself. On the menu to forget network/connect/disconnect, there is an advanced network section at the bottom with the MAC address. For 802.1x,
The setup provides a code, which you type in on Android tablet's mobile app. It then connects to and signs in, using the account that the tablet uses (Zach's account).
Update the Meta Quest
USB Debugging - Perform either from mobile app or on the headset
1. Put on the Meta Quest headset and sign into the developer account you want to use for development.
2. On the headset, go to **Settings** > **System** > **Developer**, and then turn on the **USB Connection Dialog** option. (Alternatively, you can open the Meta Quest Mobile App, select the headset from the list, and then turn on the **Developer Mode** option
3. Connect the headset to the computer using a USB-C cable and put on the headset again.
4. Click **Allow** when prompted to allow access to data.
5. Connect your headset to the computer using a USB-C cable and wear the headset.
6. Accept **Allow USB Debugging** and **Always allow from this computer** when prompted on the headset.
##### **PC Configuration**
- The lab machines needed to be added to an AD security group for firewall ---> facebook exceptions.
- In the Unity hub, select the current Unity installation, select the gear icon, then add module. Add Visual studio code and the Android SDK and it's nested modules.
- On the Computer, install the Meta Quest Developer Hub (MQDH).
- Connect Meta Quest via USB and add the device.
- In unity, the game must be built and ran as an Android project.
# LastPass
# New Page
[Data Privacy Complaint Form](https://wiki.sumnersd.org/Loading%E2%80%A6)
# Chromebooks
# How to Set the Keyboard Layout to English (US)
**These instructions have been migrated to the Technology Services department's new documentation platform. Please [refer to this link](https://sumnersd.getoutline.com/s/abe5eea0-fa4e-4a5b-b1fc-6a1f946373aa/doc/how-to-set-the-keyboard-layout-to-english-us-99sXyFSHlG) to keep up with the most up-to-date instructions and information. The content on this page is no longer maintained and will be removed in the near future.**
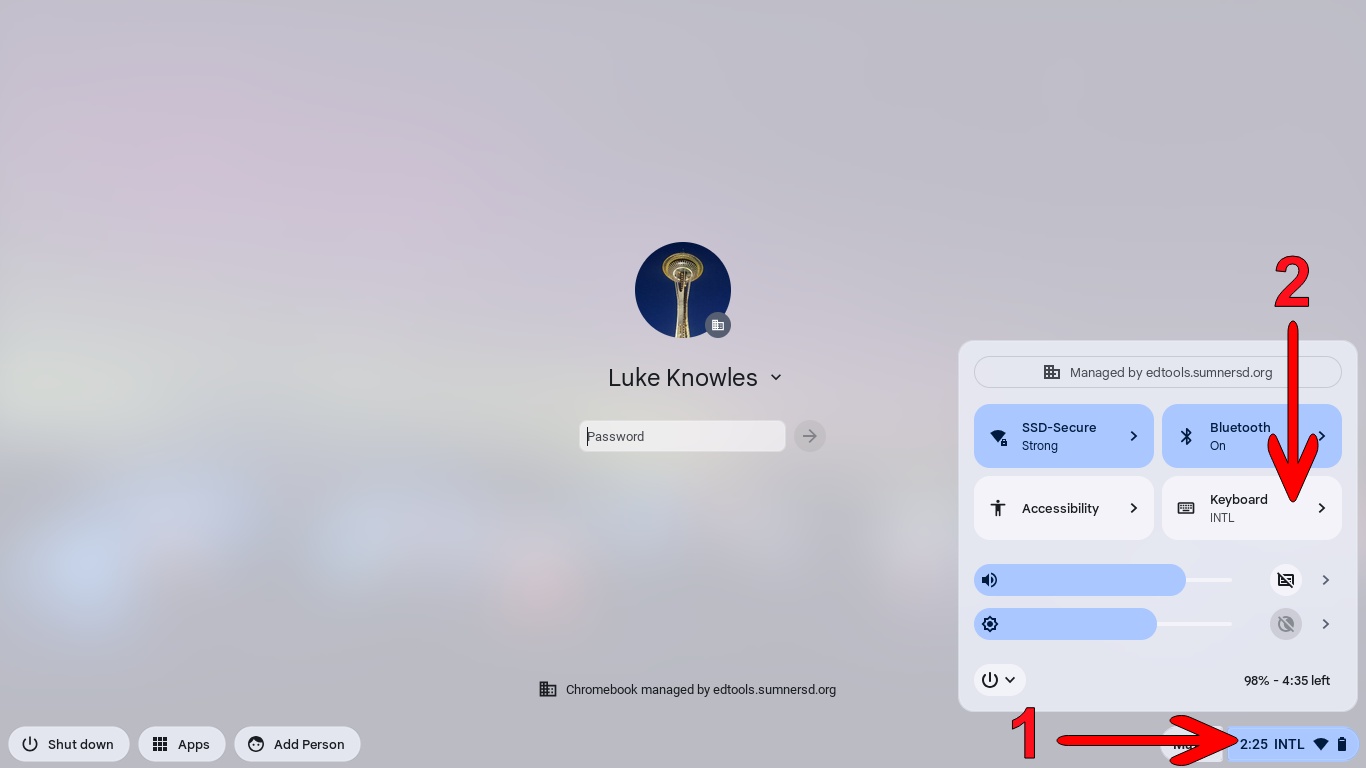
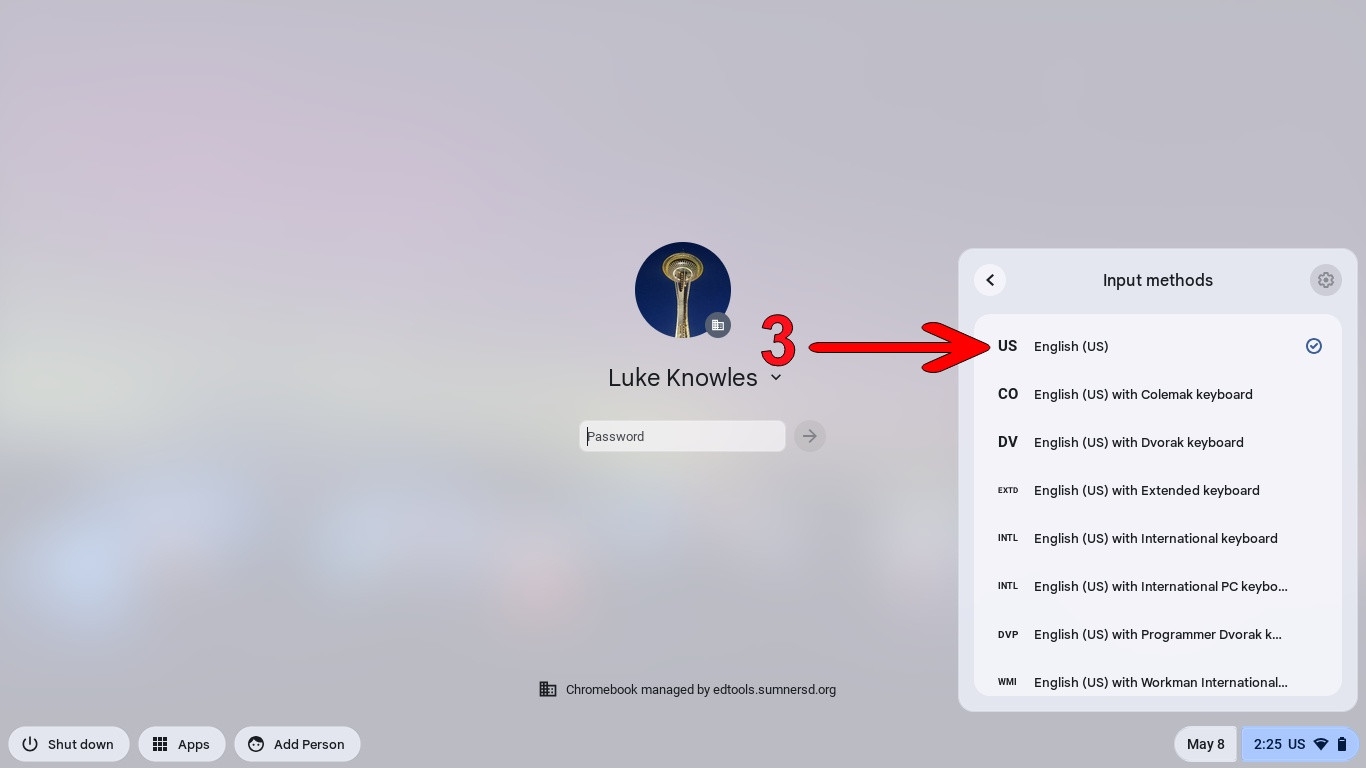
**1)** While at the sign-in screen, click the system tray located in the bottom-right corner
**2)** Click the Keyboard menu button
**3)** Select the English (US) keyboard option
[](https://wiki.sumnersd.org/uploads/images/gallery/2024-05/iaeSWoRz97QRVtou-image-9.jpg)
[](https://wiki.sumnersd.org/uploads/images/gallery/2024-05/bsc0CliVATj3MC44-image-10.jpg)
It's easy to accidentally change the keyboard layout through shortcuts without even realizing it! If your Chromebook's keyboard layout gets changed back unintentionally, try pressing the `CTRL` + `Space` keys to swap between the 2 most recent layouts.